
MacOS User Guide
Lire le guide de l'utilisateur en français
Use WordQ
![]()
![]() Options displays a dropdown menu to customize your use of WordQ.
Options displays a dropdown menu to customize your use of WordQ.
![]()
![]() Words: Show
Words: Show ![]() or hide
or hide ![]() the predicted word list. Click or press CONTROL+6 (or assigned hot key).
the predicted word list. Click or press CONTROL+6 (or assigned hot key).
![]()
![]() Speech: Turn speech feedback On
Speech: Turn speech feedback On ![]() or Off
or Off ![]() . Click or press CONTROL+7 (or assigned hot key).
. Click or press CONTROL+7 (or assigned hot key).
![]()
![]() Read: Start
Read: Start ![]() or stop
or stop ![]() reading selected text. Click or press CONTROL+8 (or assigned hot key).
reading selected text. Click or press CONTROL+8 (or assigned hot key).
Topics allows you to emphasize words in the prediction. A topic is a list of words that are part of your vocabulary that are predicted faster. Click to show available topics or press CONTROL+9 (or assigned hot key).
My Words. View your Main user vocabulary, spelling errors to review, topic lists, and abbreviation-expansions
Abbreviations. Turn abbreviation-expansions ON/OFF.
Prediction… Customize word predictions.
Speech Feedback… Customize speech feedback.
Hot Keys… Customize hot keys to control the buttonbar.
New User… Create a new user profile from available vocabulary templates.
Open User… Open another user profile.
Save User… Save current user profile.
Save User As… Save current user profile with a different name.
Delete User… Delete a user profile.
Preferences. Choose advanced settings.
Exam Mode. Limits WordQ features that may not be allowed during exams/assessments for a time-limited period.
Help. View help instructions; view online help videos; check for updates; view End User License Agreement.
Quit. Quits WordQ and saves current user profile.
Step 1: Start WordQ
 Click WordQ dock icon to run WordQ.
 - Choose and save your own user vocabulary.
- First, select a language and writing vocabulary that you want to use. Click on a vocabulary name to see a description below.
- Second, save your vocabulary. By default, WordQ will save your vocabulary under your Documents:WordQ Users folder. It is easiest to use you own name when saving.
- The WordQ buttonbar will then appear.
Step 2: Start your writing application
- Start a writing application such as TextEdit, Pages, or MS Word. The prediction word list will appear at the text cursor.
- Whenever you switch applications (e.g., from TextEdit to Mail), the prediction word list will automatically move to that application.
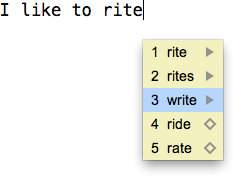
Step 3: Begin typing and predicting
- Type the first letter of a word. Words will appear in the prediction word list. If the word that you want is in the list, select it by typing the number in front of it, or by pointing and clicking. If your word is not in the list, continue typing until your word appears.
- Note: If you can’t see the prediction word list, ensure the Words
 button is turned on.
- Note: If you can’t see the prediction word list, ensure the Words
- You can hear each word in the prediction box by pressing the DOWN arrowkey or mousing over the words. When listening to the words, you can select them with the RETURN key or by clicking on them with the mouse.
- Note: If you can’t hear the words spoken, ensure the Speech
 button is turned on, and that the speakers are connected and powered on. Also, ensure that the volume is adjusted on both the speakers and in the system settings.
- Note: If you can’t hear the words spoken, ensure the Speech
- As soon as you select a word, it will be entered into your application. It will also be spoken aloud to confirm your selection.
- WordQ will then display words that most likely follow. You don’t have to select words that WordQ suggests. You can type as you would normally and only refer to the word list when you are stuck.
Step 4: Hear your sentence
- After completing your sentence, WordQ will automatically add a space and capitalize the next word for you. The entire sentence will be spoken.
Step 5: Read your sentence
- Select the Read
 button. The sentence will be highlighted. Press the SPACEBAR and it will be spoken, highlighting each word as it is spoken. It will highlight the sentence again. If you hear a mistake, you can easily correct it by using the right arrow key to read one word at a time. Use the LEFT arrow key to go back.
- Press the ESC key or click in the text with your mouse to edit text or resume writing.
If you select the wrong word by mistake, you can quickly correct it by pressing ESC. The last word will be erased and you can now select the correct word.
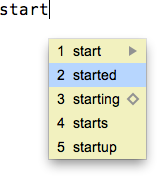
Sometimes only part of a word you want is predicted, e.g., “start” rather than “starting.”
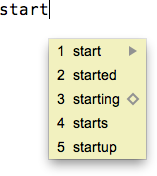
To see different endings or inflections:
- Select a partial word, e.g., “start.”
- Press DELETE to backspace.
- Variations of that word with different endings will appear. Make your selection.
To move through the document with the arrow keys:
- Hold down a LEFT, RIGHT or UP arrow key to move through a document without distraction. The word prediction box will temporarily disappear allowing you to also use the DOWN arrow key.
- When you stop, the prediction box will re-appear after a short pause.
Alternately, you can toggle the prediction box On/Off by clicking the Words icon (CONTROL+6) and move while the box is hidden.
Wherever you position the text cursor in your document, WordQ will show you appropriate predictions, even when the cursor is in the middle of a word.
Experiment with moving the cursor through a word to see how the predictions change. This feature is really useful to see different word endings.
If you type a letter within an existing word, the predicted words will be based on the letters that came before, including the one just typed.
Selecting a predicted word will replace the existing word.
Double-click or highlight a word to have it spellchecked.
Speech is turned on by default. Click Speech icon to toggle speech feedback ON ![]() and OFF
and OFF ![]() .
.
Words typed or selected from the prediction list are read out loud.
Each sentence is read out loud at the end of the sentence.
Note: Choose speech feedback cues under Options>Speech Feedback...>Feedback
To help you distinguish predicted words that look or sound similar, WordQ comes with pre-written usage examples for the most commonly confused words.
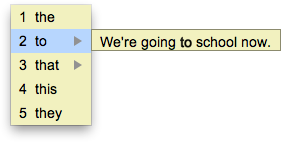
To hear usage examples:
- Step down through the predicted words by pressing the DOWN arrow key or mousing over the words and notice a TRIANGLE symbol to the right of confusing words (e.g., “to” and “too”).
- Use the RIGHT arrow key to display and hear a usage example.
You can look up synonyms for predicted words in a similar manner to usage examples. Words with synonyms are indicated by a DIAMOND symbol to the right of those words.
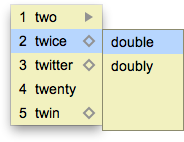
To view synonyms:
- Use the DOWN arrow key or mouse over predicted words to highlight a predicted word with a DIAMOND symbol.
- Use the RIGHT arrow key or mouse over highlighted predicted word to display its synonyms.
- Use the DOWN arrow key or mouse over synonyms to hear these words. When listening to the words, you can select them with the RETURN key or by clicking on them with the mouse.
- You may choose different word endings as described above.
WordQ will consider creative spelling when making its predictions.
Whenever there are no words in WordQ’s dictionary beginning with the letters that you type, WordQ will suggest words that take into consideration possible spelling/typing mistakes.
Also, when you highlight a word, creative spelling will be considered when predicting words, i.e., spellchecked.
To turn off creative spelling:
- Uncheck Options>Prediction...>Prediction: Predict words based on creative spelling.
You can emphasize words in the prediction by using topical words from a topic list. A topic list can be fixed or dynamic (temporary) using ThoughtQ technology.
A fixed topic list is created and saved with your profile from a list of words in a text file (see Personalize Vocabulary > Create topics manually), or by using WordQ’s quick topic word extractor (see Personalize Vocabulary > Create topics from clipboard).
A dynamic topic list is automatically created by entering a topical keyword and used temporarily. It can be changed at any time; for example, between sentences or paragraphs. Although a dynamic topic list is not saved with your profile, the list can be copied and added to a fixed topic list.
To use a fixed topic:
- Use your mouse to point to and select a topic from the Topic dropdown list in the WordQ button bar (or press CONTROL+9, followed by pressing the DOWN arrow key to move through the list and pressing RETURN to select a topic).
- Click back in your writing application and return to typing.
- Notice that topic words are predicted faster.
To turn off a fixed topic:
- At any time choose another topic, or choose <none> as a topic if you don’t want any topic.
- Click in your writing application and return to typing.
To use a dynamic topic:
- Click on the Dynamic Topic button
 (or press CONTROL+0).
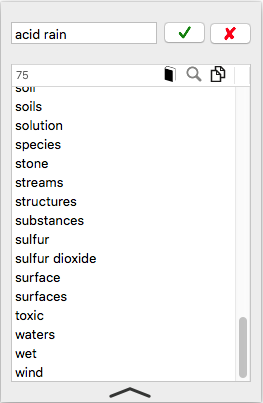
- Type a topical keyword/phrase; e.g., "acid rain" in the top edit box; then press RETURN or click on the OK
 button.
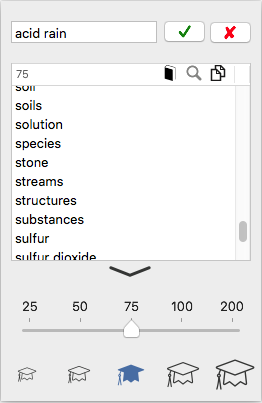
- Initially, 75 topic words/phrases at an average academic level will be displayed. In WordQ Pro, 200 topic words/phrases at the highest academic level will be displayed. You can change these values by clicking the Up arrow button
 to show options. When done, click the Down arrow button
  to hide these options.
- Click back in your writing application and return to typing.
- Notice that dynamic topic words/phrases are predicted faster and they are shown in a purple color.
- At any time you can change to new dynamic topic by entering a new topical keyword/phrase.
- Hide/show the topic list by clicking on the Dynamic Topic button (or press CONTROL+0). Hiding the topic list does not turn it off.
- Resize the topic list by dragging on a border.
- Move the topic list by dragging it from anywhere but the list itself.
To turn off a dynamic topic:
- Click the Clear button
 to clear the dynamic topic list.
 - Click in your writing application and return to typing.
To add dynamic topic words to a fixed topic list:
- Select all words in the list by pressing COMMAND+A.
- Click the Copy button
 or press COMMAND+C.
- Follow instructions in Personalize Vocabulary > Create topics from clipboard.
To get a definition of a specific topic word:
- Select a topic word from the dynamic topic list and click the Define button
 .
. - The default web browser will open with a definition of the word.
To search and discover related information:
- Select one or more topic words from the dynamic topic list and click the Search button
 . Use COMMAND+click and SHIFT+click for multiple selections.
 - The default web browser will open with results related to topic keyword + topic word.
A combination of letters, an “abbreviation,” may be defined to represent a word or phrase, e.g., “iwbt” for “I want to book a ticket for ”.
When you type an abbreviation followed by the SPACEBAR or RETURN key, it expands to the assigned word or phrase.
You can create your own set of abbreviations that are easy for you to use and remember. There is no limit on the number of abbreviations that may be saved in one set.
![]()
Exam Mode turns off WordQ features that may not be allowed during exams/assessments. In particular, those features that may be deemed unfair or allow “cheating.”
A teacher or exam supervisor typically initiates this mode and chooses the time limit.
Prior to starting Exam Mode it is important that the user loads their personal vocabulary and configures their desired usability features, such as Voice, Word List display, and Selection settings.
After choosing Exam Mode, a warning dialog will be displayed indicating the following features are turned off and not available:
- Options menu
- Abbreviation-expansion
- Pronunciation exceptions
- Synonyms
- Word List following the cursor (Note: the Word list must be manually positioned)
- Predictive phrases
- Next word predictions
Two features to allow are optional:
- Word usage examples (Default = OFF)
- User-added single words, including Topic words (Default = ON)
Choosing the Exam Mode time limit:
- Using the up and down arrow buttons, choose the time limit between 0.5 and 8 hrs.
- After clicking OK, it is not possible to turn Exam Mode off until the time limit has been reached or the computer is re-started (not logging off/on).
- After the time limit has been reached, the Exam Mode will be cancelled the next time the WordQ is run.
Read Text
Press the DOWN arrow to hear each predicted word spoken.
WordQ speaks back letters, words, and sentences. Any combination of these may be used:
- Speaking letters helps you hear, when not paying attention to the screen, whether you typed the correct letter.
- Speaking words helps you hear whether you made the right selection. It also helps you hear spelling mistakes as a word generally won’t sound right if you make a mistake. If vowels are left out, the word will be spoken letter-by-letter. This complements underlining errors done by some word processors.
- Speaking sentences helps you immediately hear how words flow in a sentence to hear whether you made some mistake(s). Also, if you never hear a sentence spoken, that is a cue that you have forgotten to use an ending punctuation.
Note: Choose these speaking cues under Options>Speech Feedback...>Feedback
To read a block of text:
- Highlight the block of text to read.
- Click Read button.
- The text is read immediately. Each word is highlighted as it is spoken.
- Press the ESC key or click mouse button at any time to stop reading.
Note: Word-by-word highlighting is limited to common Apple applications including iLife, and iWork, as well as Facebook (in Safari), and MS Word.
Proofreading sentences uses both visual and spoken cues to help you find mistakes in word order, word form, missing words, grammar, spelling and punctuation. By listening to the flow of words you can hear whether it makes sense. You can often hear mistakes that you don’t see.
WordQ offers a special proofreading mode in common Apple applications including Pages, as well as Facebook (in Safari), and MS Word. Here the current sentence is spoken with each word is highlighted word-by-word emphasizing the visual/spoken shape of each word. All of this is done directly in the application.
If you hear a mistake you can then step through the sentence word-by-word to locate the mistake. For example, you may hear two words that sound wrong together. You may have left a word out in between or one of the words may be incorrect.
When non-Apple applications are used (e.g., Chrome, Adobe applications, Inspiration), word-by-word highlighting is not always available and you must manually highlight the text as described above (Read a block of text). If word-by-word highlighting is desired in these situations, you can easily copy and paste the text into TextEdit for proofreading.
To proofread a sentence:
- Position the text cursor anywhere in the sentence.
- Click Read.
- The sentence will be highlighted and the prediction box will temporarily disappear. The keyboard is disabled except for SPACEBAR, ESC, and the ARROW keys.
- Press SPACEBAR to begin reading the sentence. Each word is highlighted as it is spoken. Listen for any mistakes. Press SPACEBAR to pause/resume reading.
- The sentence is highlighted again after it has been read.
You may then:
- Read individual words to locate specific errors by repeatedly pressing RIGHT or LEFT arrow keys to move within a sentence.
- Press the ESC key or click in the text with your mouse to resume writing and make corrections
- Read the sentence again by pressing SPACEBAR
- Go to the previous or next sentence by pressing UP or DOWN arrow keys.
Type your text as best as you can. Don’t worry about punctuation for the moment. When you’ve finished typing a section, use proofreading as described before to have WordQ read your text back to you.
If you’re not sure about punctuation, experiment. Put in a comma or a question mark where you think it might go.
Listen to the sentence(s) being read back. The speech will automatically pause at each punctuation mark and the intonation will change. Make changes until you are satisfied with how it sounds.
The Read function may not always work with more complex formatting, such as some tables.
It may also be unable to read unusual characters. Such problem are most common when trying to read websites.
The document that you are reading must be the active application for text to be read. Do not click WordQ titlebar before clicking Read.
Personalize Vocabulary
Select My Words... from the Options menu. The Main tab page will be displayed.
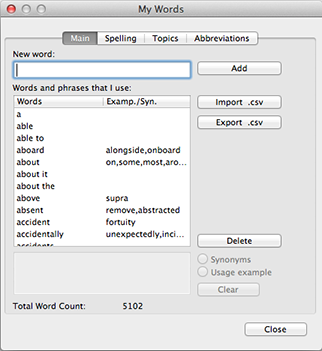
You can add personal words or phrases to your WordQ vocabulary such as the names of family and friends. While WordQ includes many common names, adding your own names helps WordQ identify ones that are important to you.
You can also choose to add your words as you type. WordQ will automatically learn correctly spelled words.
To add a word or a phrase:
- Type a word or short phrase (up to 30 characters; no numbers) in the New Word box and then select Add or press RETURN.
- You may add any number of words that you want. Be careful with your spelling, as words are not checked for spelling at this time.
- If the word is already in the list, it will be highlighted for you.
- Select Close to accept your words.
To add words as you type:
- Select Prediction... from the Options menu on the WordQ button bar, and then Ccick Prediction tab. Ensure that the following option is set: Predict new words that I use
- New vocabulary words will automatically be added to your vocabulary as you type if they are correctly spelled.
Misspelled words and unrecognized words will be put aside for you to review later.
To share your vocabulary:
- Choose Export .csv to export your vocabulary in a comma-separated file format. This file may be shared with another user.
- Choose Import .csv to import a vocabulary that has been saved using the Export .csv function (only).
Select My Words... from the Options menu. Then click Spelling tab.
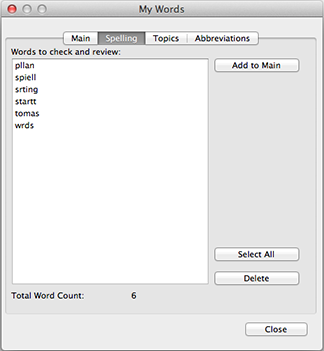
Misspelled and unrecognized words are shown here for you to review.
To accept words for prediction:
- Select individual words by clicking on them. Select a range of words with the common SHIFT+click action. Select separate words with COMMAND+click.
- Click Add to Main to add selected words to your main list of words. The words will now be used in word prediction.
- Click Close when done.
To delete misspelled words:
- Select individual words by clicking on them. Select a range of words with the common SHIFT+click action. Select separate words with COMMAND+click.
- Click Delete to remove selected words from the list.
- Click Close when done.
Note: Leaving words in the spelling list does not affect word prediction. You may accept or delete words at any time.
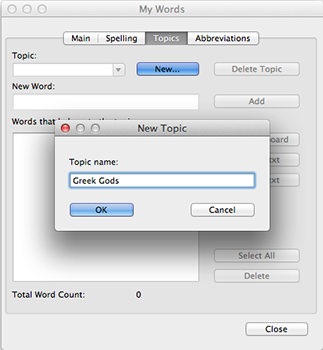
Select My Words... from the Options menu. Then click Topics tab.
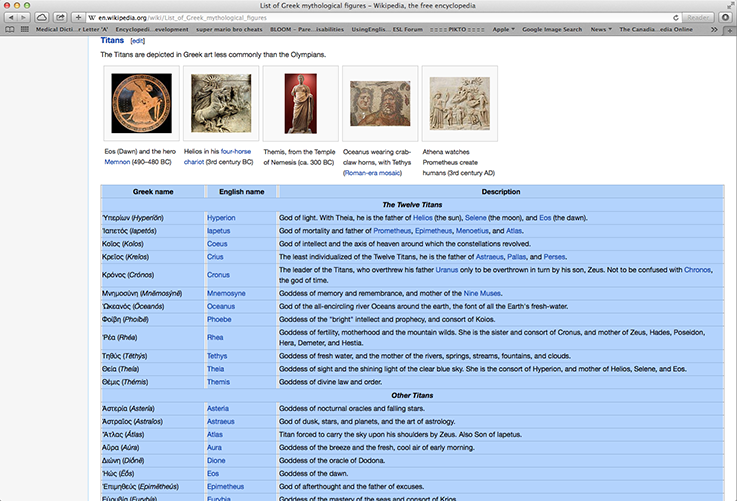
WordQ 4 can automatically learn topic words from any text copied to the clipboard from any application (including the Web).
To create a topic list from clipboard text:
In WordQ:
- Choose an existing topic, or click New... Type in a Topic Name and click OK in the New Topic dialog.
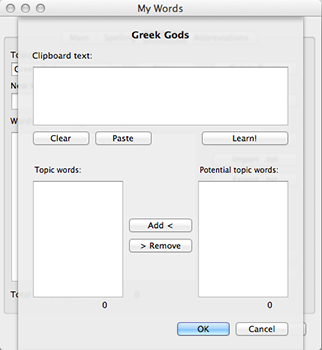
- Click Learn Clipboard to display a new pop-up dialog.
- Click Clear to clear your computer’s clipboard.
In any application (e.g., web page) with text to learn:
- Select and copy the text (usually all the text) to the clipboard.
Note: The application must allow you to copy text.
In WordQ:
- Click Paste to paste the copied text as Raw Text.
- Click Learn! to learn topic words from the text.
- Two lists of words will be displayed:
- The left list shows Topic words that are known to be spelled correctly.
- The right list shows Potential topic words that are unrecognized (novel or misspelled.)
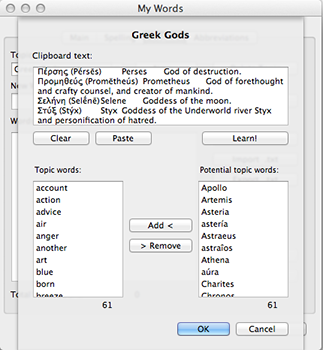
- Review and select desired topic words in the Potential list (individually; SHIFT+click; COMMAND+click; or COMMAND-a) and click Add < to add desired words to Topic words.
- Review and select unwanted words in the Topic list (individually; SHIFT+click; or COMMAND+click) and click > Delete to delete them from Topic words.
- Click OK when done.
- You will now be back to the MyWords: Topics tab page.
- Repeat the above to add more topic words, delete unwanted words, or click Close.
To share topic words:
- Choose Export .txt to export your topic list as a plain text file. This file may be shared with another user.
- Choose Import .txt to import a topic list that has been saved using the Export .txt function (only).
Select My Words... from the Options menu. Then click Topics tab.
To create a topic list:
- Click New... Type in a Topic Name and click OK in the pop-up dialog.
- Add words one-by-one or from a text file as described below.
To add topic words one-by-one:
- Type a word or short phrase (up to 30 letters) in the New word box and click Add or press RETURN.
The word will be copied to the list and placed in alphabetical order.
- Repeat for all topic words.
To add topic words from a text file:
- Select the Import .txt button.
- Locate a previously-created text-only file that contains a list of words (or short phrases), each on its own line.
- The words will be added to your topic list.
To share topic words:
- Choose Export .txt to export your topic list as a plain text file. This file may be shared with another user.
- Choose Import .txt to import a topic list that has been saved using the Export .txt function (only).
Select My Words... from the Options menu. Then click Abbreviations tab.
To add abbreviation-expansions one-by-one:
- Type in an abbreviation using only letters and click Add.
- The abbreviation will be entered in the list of abbreviations in alphabetical order.
- Type the expanded text in the Expansion box.

- Repeat for all abbreviation-expansions.
- Use CTRL+RETURN to add a line in an expansion.
To share your abbreviation-expansions:
- Choose Export .abb to export your abbreviation-expansions to share with another user.
- Choose Import .abb to import abbreviation-expansions that has been saved using the Export .abb function (only).
Personalize Prediction Options
Select Prediction... from the Options menu. Then click Word List tab.
Words
Number of words. Choose the number of words (1 – 9). (Default = 5)
Font. Select the Font button and choose the font, style and size. The prediction box automatically changes size with any font changes.
Display synonyms turns the display of synonyms On/Off. (Default = ON)
Display usage examples turns the display of usage examples On/Off. (Default = ON)
Order of predicted words
Most likely shows predicted words in most likely order. (Default)
Alphabetical shows predicted words in alphabetical order.
Layout
Vertical list displays predicted words vertically, which is generally easier to read. (Default)
Horizontal list displays predicted words in a single row.
Position of List
Follow text cursor displays predicted words following the text insertion cursor as you type. (Default)
Leave in place displays predicted words at a fixed location as you type. You can drag the list to another location using the title bar that is shown only when this option is selected.
Select Prediction... from the Options menu. Then click Prediction tab.
Word prediction
Predict new words that I use enables WordQ to automatically add correctly spelled words to your vocabulary. Novel and misspelled words are put aside for you to review. See Review misspelled or unrecognized words above. (Default = ON)
Predict words from the WordQ Dictionary suggests words from the WordQ Dictionary when appropriate words cannot be found in your vocabulary. (Default = ON)
Predict next words displays the words that are most likely to follow the word you have just selected. (Default = ON)
Adapt predictions based on how I combine words enables WordQ to learn which words you use to follow one another. If you have trouble with grammar, you may want to leave this option unchecked. (Default = OFF)
Predict words based on creative spelling enables WordQ to consider creative spelling when making its predictions. Whenever there are no words in WordQ’s dictionary beginning with the letters that you type, WordQ will suggest words that take into consideration possible spelling/typing mistakes. Also, when you highlight a word, creative spelling will be considered when predicting words, i.e., spell checked. (Default = ON)
Following a word prediction
Add spaces and adjust punctuation. You can choose to let WordQ automatically add a space after you select a predicted word. When you type a punctuation mark, WordQ will remove this training space, place the punctuation and add any necessary spaces. (Default = ON)
You may also choose to:
- Add 1 space after you end a sentence. This is the common rule with computer fonts. (Default)
- Add 2 spaces after you end a sentence.
Capitalize the first word of the next sentence. This option is only available when the previous option is selected, and only works if you immediately begin typing the next sentence after typing an end-of-sentence mark. (Default = ON)
To keep your vocabulary from learning new words:
- Uncheck Predict new words that I use
- Uncheck Adapt predictions based on how I combine words
To predict words from only your vocabulary:
- Uncheck Predict words from the WordQ Dictionary
Select Prediction... from the Options menu. Then click Selection tab.
Keyboard selection
Select by number enables selection of predicted words by either the number line or numeric keyboard. (Default = ON)
- Use the number line uses the numbers above the letters to select predicted words. (Default)
- Use the numeric keyboard uses the numbers on a numeric keypad (on extended keyboard) to select predicted words.
Mouse selection
Point and click to select a word enables selection of predicted words by a mouse/trackpad. (Default = ON)
Personalize Speech Feedback
Select Speech Feedback... from the Options menu. Then click Voice tab.
To adjust the voice:
Volume adjusts the speech volume. The maximum volume is the current Windows volume setting.
Reading Speed adjusts the reading speed of the selected voice.
To change the reading voice:
- Choose from the list of available voices.
- Click Try button to hear how the voice sounds with its selected settings.
Select Speech Feedback... from the Options menu. Then click Feedback tab.
To hear what you type:
Speak letters helps you confirm which character you have typed. Each letter is spoken as you type it.
Speak words helps you detect spelling errors. Each word that you type or select is spoken.
Speak sentences helps you hear the word flow in a sentence to decide whether the proper words and punctuation have been used.
To hear predicted words:
- Select Read word predictions to hear predicted words spoken when you point to them.
To hear menus:
- Select Read menus to hear items spoken when you point to them. This includes items in pop-up menus.
To hear file names, buttons, options and other window text
- Select Read file names, buttons, options and other window text to hear the names of these objects. This includes desktop icons and file lists.
Select Speech Feedback... from the Options menu. Then click Pronunciations tab.
Change pronunciations of certain words (e.g., your name) if the current pronunciation is inaccurate.
Simply spell the exception as you think it should be spoken.
To share your word pronunciations:
- Choose Export .pxn to export your abbreviation-expansions to share with another user.
- Choose Import .pxn to import a vocabulary that has been saved using the Export .pxn function (only).