
Windows User Guide
Lire le guide de l'utilisateur en français
Use WordQ
![]()
![]() Options displays a dropdown menu to customize your use of WordQ.
Options displays a dropdown menu to customize your use of WordQ.
![]()
![]() Words: Show
Words: Show ![]() or hide
or hide ![]() the predicted word list. Click or press F9 (or assigned hot key).
the predicted word list. Click or press F9 (or assigned hot key).
![]()
![]() Speech: Turn speech feedback On
Speech: Turn speech feedback On ![]() or Off
or Off ![]() . Click or press F10 (or assigned hot key).
. Click or press F10 (or assigned hot key).
![]()
![]() Mic: Turn the microphone On
Mic: Turn the microphone On ![]() or Off
or Off ![]() . Click or press F8 (or assigned hot key).
. Click or press F8 (or assigned hot key).
![]()
![]() Read: Start
Read: Start ![]() or stop
or stop ![]() reading selected text. Click or press F11 (or assigned hot key).
reading selected text. Click or press F11 (or assigned hot key).
Topics allows you to emphasize words in the prediction. A topic is a list of words that are part of your vocabulary that are predicted faster. Click to show available topics or press F12 (or assigned hot key).
My Words. View your Main user vocabulary, spelling errors to review, topic lists, and abbreviation-expansions
Abbreviations. Turn abbreviation-expansions ON/OFF.
Prediction… Customize word predictions.
Speech Feedback… Customize speech feedback.
Hot Keys… Customize hot keys to control the buttonbar.
Speech Recognition… Create a speech recognition profile and adjust settings.
Train Speech Train WordQ to recognize your voice.
Train Word… Add a new word or prevent a word from being dictated.
New User… Create a new user profile from available vocabulary templates.
Open User… Open another user profile.
Save User… Save current user profile.
Save User As… Save current user profile with a different name.
Delete User… Delete a user profile.
Preferences. Choose advanced settings.
Exam Mode. Limits WordQ features that may not be allowed during exams/assessments for a time-limited period.
Help. View help instructions; view online help videos; check for updates; view End User License Agreement.
Quit. Quits WordQ and saves current user profile.
Step 1: Start WordQ
 Click WordQ dock icon to run WordQ.
 - Choose and save your own user vocabulary.
- First, select a language and writing vocabulary that you want to use. Click on a vocabulary name to see a description below.
- Second, save your vocabulary. By default, WordQ will save your vocabulary under your Documents:WordQ Users folder. It is easiest to use you own name when saving.
- The WordQ buttonbar will then appear.
Step 2: Start your writing application
- Start a writing application such as Notepad, WordPad, or MS Word. The prediction word list will appear at the text cursor.
- Whenever you switch applications (e.g., from Notepad to MS Word), the prediction word list will automatically move to that application.
Step 3: Begin typing and predicting
- Type the first letter of a word. Words will appear in the prediction word list. If the word that you want is in the list, select it by typing the number in front of it, or by pointing and clicking. If your word is not in the list, continue typing until your word appears.
- Note: If you can’t see the prediction word list, ensure the Words
 button is turned on.
- Note: If you can’t see the prediction word list, ensure the Words
- You can hear each word in the prediction box by pressing the DOWN arrowkey or mousing over the words. When listening to the words, you can select them with the ENTER key or by clicking on them with the mouse.
- Note: If you can’t hear the words spoken, ensure the Speech
 button is turned on, and that the speakers are connected and powered on. Also, ensure that the volume is adjusted on both the speakers and in the system settings.
- Note: If you can’t hear the words spoken, ensure the Speech
- As soon as you select a word, it will be entered into your application. It will also be spoken aloud to confirm your selection.
- WordQ will then display words that most likely follow. You don’t have to select words that WordQ suggests. You can type as you would normally and only refer to the word list when you are stuck.
Step 4: Hear your sentence
- After completing your sentence, WordQ will automatically add a space and capitalize the next word for you. The entire sentence will be spoken.
Step 5: Read your sentence
- Select the Read
 button. The sentence will be highlighted. Press the SPACEBAR and it will be spoken, highlighting each word as it is spoken. It will highlight the sentence again. If you hear a mistake, you can easily correct it by using the right arrow key to read one word at a time. Use the LEFT arrow key to go back.
- Press the ESC key or click in the text with your mouse to edit text or resume writing.
If you select the wrong word by mistake, you can quickly correct it by pressing ESC. The last word will be erased and you can now select the correct word.
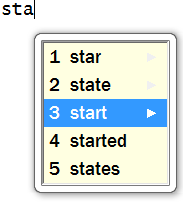
Sometimes only part of a word you want is predicted, e.g., “start” rather than “starting.”
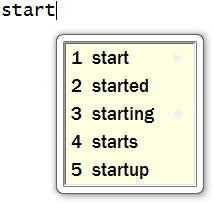
To see different endings or inflections:
- Select a partial word, e.g., “start.”
- Press DELETE to backspace.
- Variations of that word with different endings will appear. Make your selection.
To move through the document with the arrow keys:
- Hold down a LEFT, RIGHT or UP arrow key to move through a document without distraction. The word prediction box will temporarily disappear allowing you to also use the DOWN arrow key.
- When you stop, the prediction box will re-appear after a short pause.
Alternately, you can toggle the prediction box On/Off by clicking the Words icon (F9) and move while the box is hidden.
Wherever you position the text cursor in your document, WordQ will show you appropriate predictions, even when the cursor is in the middle of a word.
Experiment with moving the cursor through a word to see how the predictions change. This feature is really useful to see different word endings.
If you type a letter within an existing word, the predicted words will be based on the letters that came before, including the one just typed.
Selecting a predicted word will replace the existing word.
Double-click or highlight a word to have it spellchecked.
Speech is turned on by default. Click Speech icon to toggle speech feedback ON ![]() and OFF
and OFF ![]() .
.
Words typed or selected from the prediction list are read out loud.
Each sentence is read out loud at the end of the sentence.
Note: Choose speech feedback cues under Options>Speech Feedback...>Feedback
To help you distinguish predicted words that look or sound similar, WordQ comes with pre-written usage examples for the most commonly confused words.
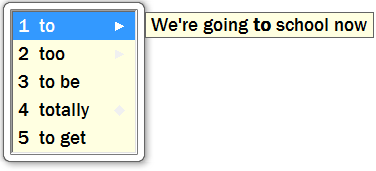
To hear usage examples:
- Step down through the predicted words by pressing the DOWN arrow key or mousing over the words and notice a TRIANGLE symbol to the right of confusing words (e.g., “to” and “too”).
- Use the RIGHT arrow key to display and hear a usage example.
You can look up synonyms for predicted words in a similar manner to usage examples. Words with synonyms are indicated by a DIAMOND symbol to the right of those words.
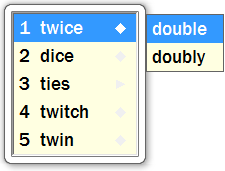
To view synonyms:
- Use the DOWN arrow key or mouse over predicted words to highlight a predicted word with a DIAMOND symbol.
- Use the RIGHT arrow key or mouse over highlighted predicted word to display its synonyms.
- Use the DOWN arrow key or mouse over synonyms to hear these words. When listening to the words, you can select them with the ENTER key or by clicking on them with the mouse.
- You may choose different word endings as described above.
WordQ will consider creative spelling when making its predictions.
Whenever there are no words in WordQ’s dictionary beginning with the letters that you type, WordQ will suggest words that take into consideration possible spelling/typing mistakes.
Also, when you highlight a word, creative spelling will be considered when predicting words, i.e., spellchecked.
To turn off creative spelling:
- Uncheck Options>Prediction...>Prediction: Predict words based on creative spelling.
You can emphasize words in the prediction by using topical words from a topic list. A topic list can be fixed or dynamic (temporary) using ThoughtQ technology.
A fixed topic list is created and saved with your profile from a list of words in a text file (see Personalize Vocabulary > Create topics manually), or by using WordQ’s quick topic word extractor (see Personalize Vocabulary > Create topics from clipboard).
A dynamic topic list is automatically created by entering a topical keyword and used temporarily. It can be changed at any time; for example, between sentences or paragraphs. Although a dynamic topic list is not saved with your profile, the list can be copied and added to a fixed topic list.
To use a fixed topic:
- Use your mouse to point to and select a topic from the Topic dropdown list in the WordQ button bar (or press CONTROL+9, followed by pressing the DOWN arrow key to move through the list and pressing RETURN to select a topic).
- Click back in your writing application and return to typing.
- Notice that topic words are predicted faster.
To turn off a fixed topic:
- At any time choose another topic, or choose <none> as a topic if you don’t want any topic.
- Click in your writing application and return to typing.
To use a dynamic topic:
- Click on the Dynamic Topic button
 (or press CONTROL+0).
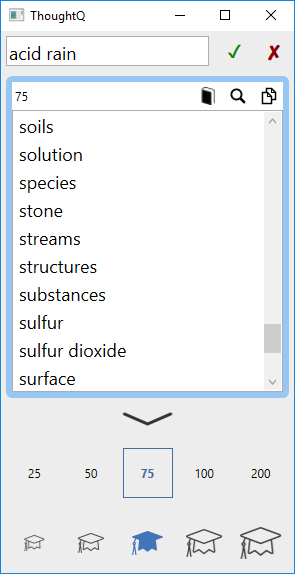
- Type a topical keyword/phrase; e.g., "acid rain" in the top edit box; then press RETURN or click on the OK
 button.
- Initially, 75 topic words/phrases at an average academic level will be displayed. In WordQ Pro, 200 topic words/phrases at the highest academic level will be displayed. You can change these values by clicking the Up arrow button
 to show options. When done, click the Down arrow button
  to hide these options.
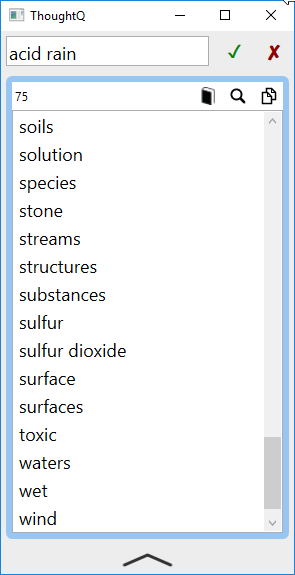
- Click back in your writing application and return to typing.
- Notice that dynamic topic words/phrases are predicted faster and they are shown in a purple color.
- At any time you can change to new dynamic topic by entering a new topical keyword/phrase.
- Hide/show the topic list by clicking on the Dynamic Topic button (or press CONTROL+0). Hiding the topic list does not turn it off.
- Resize the topic list by dragging on a border.
- Move the topic list by dragging it from anywhere but the list itself.
To turn off a dynamic topic:
- Click the Clear button
 to clear the dynamic topic list.
 - Click in your writing application and return to typing.
To add dynamic topic words to a fixed topic list:
- Select all words in the list by pressing COMMAND+A.
- Click the Copy button
 or press CONTROL+C.
 - Follow instructions in Personalize Vocabulary > Create topics from clipboard.
To get a definition of a specific topic word:
- Select a topic word from the dynamic topic list and click the Define button
 .
. - The default web browser will open with a definition of the word.
To search and discover related information:
- Select one or more topic words from the dynamic topic list and click the Search button
 . Use CONTROL+click and SHIFT+click for multiple selections.
 - The default web browser will open with results related to topic keyword + topic word.
A combination of letters, an “abbreviation,” may be defined to represent a word or phrase, e.g., “iwbt” for “I want to book a ticket for ”.
When you type an abbreviation followed by the SPACEBAR or ENTER key, it expands to the assigned word or phrase.
You can create your own set of abbreviations that are easy for you to use and remember. There is no limit on the number of abbreviations that may be saved in one set.
![]()
Exam Mode turns off WordQ features that may not be allowed during exams/assessments. In particular, those features that may be deemed unfair or allow “cheating.”
A teacher or exam supervisor typically initiates this mode and chooses the time limit.
Prior to starting Exam Mode it is important that the user loads their personal vocabulary and configures their desired usability features, such as Voice, Word List display, and Selection settings.
After choosing Exam Mode, a warning dialog will be displayed indicating the following features are turned off and not available:
- Options menu
- Abbreviation-expansion
- Pronunciation exceptions
- Synonyms
- Word List following the cursor (Note: the Word list must be manually positioned)
- Predictive phrases
- Next word prediction
Two features to allow are optional:
- Word usage examples (Default = OFF)
- User-added single words, including Topic words (Default = ON)
Choosing the Exam Mode time limit:
- Using the up and down arrow buttons, choose the time limit between 1 and 6 hrs.
- After clicking OK, it is not possible to turn Exam Mode off until the time limit has been reached or the computer is re-started (not logging off/on).
- After the time limit has been reached, the Exam Mode will be cancelled the next time the WordQ is run.
Read Text
Press the DOWN arrow to hear each predicted word spoken.
WordQ speaks back letters, words, and sentences. Any combination of these may be used:
- Speaking letters helps you hear, when not paying attention to the screen, whether you typed the correct letter.
- Speaking words helps you hear whether you made the right selection. It also helps you hear spelling mistakes as a word generally won’t sound right if you make a mistake. If vowels are left out, the word will be spoken letter-by-letter. This complements underlining errors done by some word processors.
- Speaking sentences helps you immediately hear how words flow in a sentence to hear whether you made some mistake(s). Also, if you never hear a sentence spoken, that is a cue that you have forgotten to use an ending punctuation.
Note: Choose these speaking cues under Options>Speech Feedback...>Feedback
To read a block of text:
- Highlight the block of text to read.
- Click Read button.
- The text is read immediately. Each word is highlighted as it is spoken.
- Press the ESC key or click mouse button at any time to stop reading.
Note: Word-by-word highlighting is limited to common Apple applications including iLife, and iWork, as well as Facebook (in Safari), and MS Word.
Proofreading sentences uses both visual and spoken cues to help you find mistakes in word order, word form, missing words, grammar, spelling and punctuation. By listening to the flow of words you can hear whether it makes sense. You can often hear mistakes that you don’t see.
WordQ offers a special proofreading mode in common Microsoft applications including MS Word, WordPad, Notepad, or Outlook. Here the current sentence is spoken with each word is highlighted word-by-word emphasizing the visual/spoken shape of each word. All of this is done directly in the application.
If you hear a mistake you can then step through the sentence word-by-word to locate the mistake. For example, you may hear two words that sound wrong together. You may have left a word out in between or one of the words may be incorrect.
When non-Microsoft applications are used (e.g., Chrome, Adobe applications, Inspiration), word-by-word highlighting is not always available and you must manually highlight the text as described above (Block of text). If word-by-word highlighting is desired in these situations, you can easily copy and paste the text into Notepad for proofreading.
To proofread a sentence:
- Position the text cursor anywhere in the sentence.
- Click Read.
- The sentence will be highlighted and the prediction box will temporarily disappear. The keyboard is disabled except for SPACEBAR, ESC, and the ARROW keys.
- Press SPACEBAR to begin reading the sentence. Each word is highlighted as it is spoken. Listen for any mistakes. Press SPACEBAR to pause/resume reading.
- The sentence is highlighted again after it has been read.
You may then:
- Read individual words to locate specific errors by repeatedly pressing RIGHT or LEFT arrow keys to move within a sentence.
- Press the ESC key or click in the text with your mouse to resume writing and make corrections
- Read the sentence again by pressing SPACEBAR
- Go to the previous or next sentence by pressing UP or DOWN arrow keys.
Type your text as best as you can. Don’t worry about punctuation for the moment. When you’ve finished typing a section, use proofreading as described before to have WordQ read your text back to you.
If you’re not sure about punctuation, experiment. Put in a comma or a question mark where you think it might go.
Listen to the sentence(s) being read back. The speech will automatically pause at each punctuation mark and the intonation will change. Make changes until you are satisfied with how it sounds.
The Read function may not always work with more complex formatting, such as some tables.
It may also be unable to read unusual characters. Such problem are most common when trying to read websites.
The document that you are reading must be the active application for text to be read. Do not click WordQ titlebar before clicking Read.
Personalize Vocabulary
Select My Words... from the Options menu. The Main tab page will be displayed.
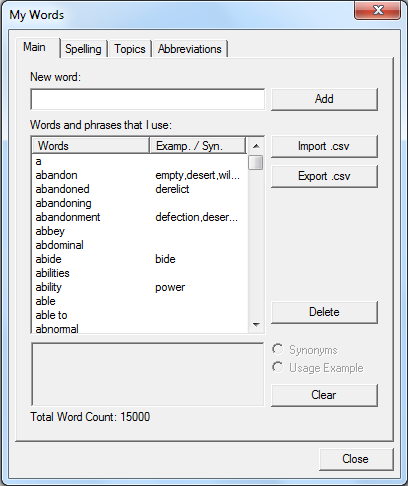
You can add personal words or phrases to your WordQ vocabulary such as the names of family and friends. While WordQ includes many common names, adding your own names helps WordQ identify ones that are important to you.
You can also choose to add your words as you type. WordQ will automatically learn correctly spelled words.
To add a word or a phrase:
- Type a word or short phrase (up to 30 characters; no numbers) in the New Word box and then select Add or press ENTER.
- You may add any number of words that you want. Be careful with your spelling, as words are not checked for spelling at this time.
- If the word is already in the list, it will be highlighted for you.
- Select Close to accept your words.
To add words as you type:
- Select Prediction... from the Options menu on the WordQ button bar, and then Ccick Prediction tab. Ensure that the following option is set: Predict new words that I use
- New vocabulary words will automatically be added to your vocabulary as you type if they are correctly spelled.
Misspelled words and unrecognized words will be put aside for you to review later.
To share your vocabulary:
- Choose Export .csv to export your vocabulary in a comma-separated file format. This file may be shared with another user.
- Choose Import .csv to import a vocabulary that has been saved using the Export .csv function (only).
Select My Words... from the Options menu. Then click Spelling tab.
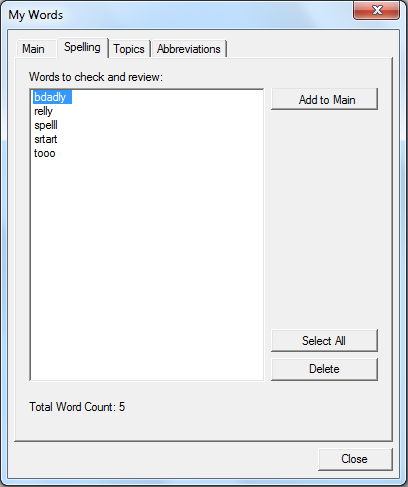
Misspelled and unrecognized words are shown here for you to review.
To accept words for prediction:
- Select individual words by clicking on them. Select a range of words with the common SHIFT+click action. Select separate words with CTRL+click.
- Click Add to Main to add selected words to your main list of words. The words will now be used in word prediction.
- Click Close when done.
To delete misspelled words:
- Select individual words by clicking on them. Select a range of words with the common SHIFT+click action. Select all words with CTRL+A.
- Click Delete to remove selected words from the list.
- Click Close when done.
Note: Leaving words in the spelling list does not affect word prediction. You may accept or delete words at any time.
Select My Words... from the Options menu. Then click Topics tab.
WordQ 4 can automatically learn topic words from any text copied to the clipboard from any application (including the Web).
To create a topic list from clipboard text:
In WordQ:
- Choose an existing topic, or click New... Type in a Topic Name and click OK in the New Topic dialog.
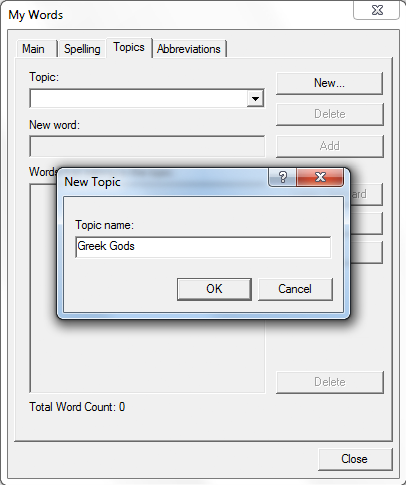
- Click Learn Clipboard to display a new pop-up dialog.
- Click Clear to clear your computer’s clipboard.
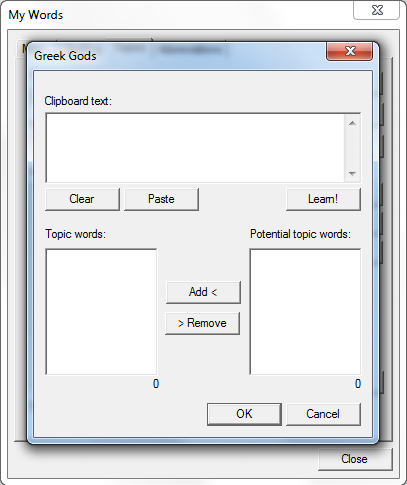
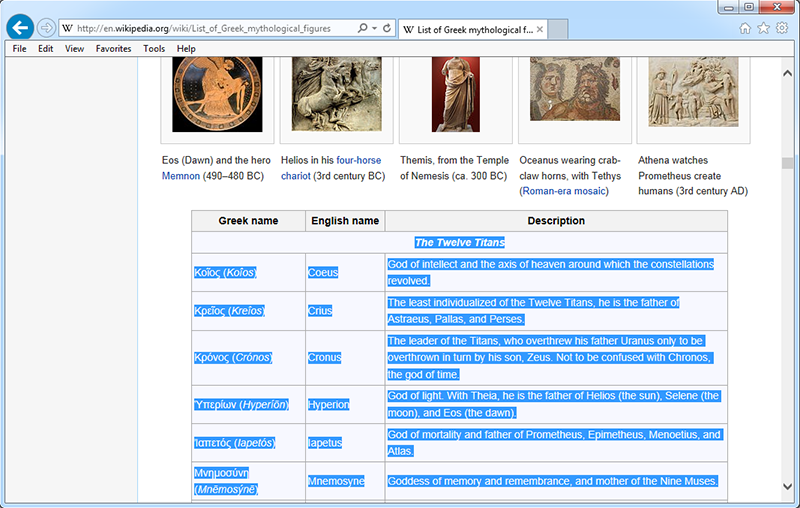
In any application (e.g., web page) with text to learn:
- Select and copy the text (usually all the text) to the clipboard.
Note: The application must allow you to copy text.
In WordQ:
- Click Paste to paste the copied text as Raw Text.
- Click Learn! to learn topic words from the text.
- Two lists of words will be displayed:
- The left list shows Topic words that are known to be spelled correctly.
- The right list shows Potential topic words that are unrecognized (novel or misspelled.)
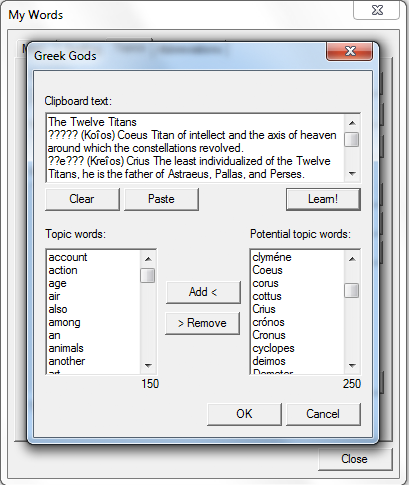
- Review and select desired topic words in the Potential list (individually; SHIFT+click; or CTRL+A) and click Add < to add desired words to Topic words.
- Review and select unwanted words in the Topic list (individually; SHIFT+click; or CTRL+A) and click > Delete to delete them from Topic words.
- Click OK when done.
- You will now be back to the MyWords: Topics tab page.
- Repeat the above to add more topic words, delete unwanted words, or click Close.
To share topic words:
- Choose Export .txt to export your topic list as a plain text file. This file may be shared with another user.
- Choose Import .txt to import a topic list that has been saved using the Export .txt function (only).
Select My Words... from the Options menu. Then click Topics tab.
To create a topic list:
- Click New... Type in a Topic Name and click OK in the pop-up dialog.
- Add words one-by-one or from a text file as described below.
To add topic words one-by-one:
- Type a word or short phrase (up to 30 letters) in the New word box and click Add or press ENTER.
The word will be copied to the list and placed in alphabetical order.
- Repeat for all topic words.
To add topic words from a text file:
- Select the Import .txt button.
- Locate a previously-created text-only file that contains a list of words (or short phrases), each on its own line.
- The words will be added to your topic list.
To share topic words:
- Choose Export .txt to export your topic list as a plain text file. This file may be shared with another user.
- Choose Import .txt to import a topic list that has been saved using the Export .txt function (only).
Select My Words... from the Options menu. Then click Abbreviations tab.
To add abbreviation-expansions one-by-one:
- Click on New... and type in an abbreviation in the Abbreviation dialog using only letters and click OK.
- The abbreviation will be entered in the list of abbreviations in alphabetical order.
- Type the expanded text in the Expansion box.
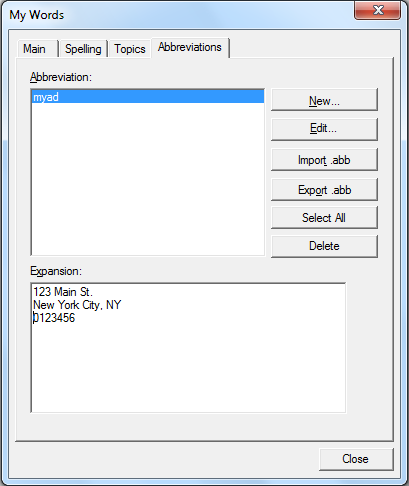
- Repeat for all abbreviation-expansions.
- Use CTRL+ENTER to add a line in an expansion.
To share your abbreviation-expansions:
- Choose Export .abb to export your abbreviation-expansions to share with another user.
- Choose Import .abb to import abbreviation-expansions that has been saved using the Export .abb function (only).
Personalize Prediction Options
Select Prediction... from the Options menu. Then click Word List tab.
Words
Number of words. Choose the number of words (1 – 9). (Default = 5)
Font. Select the Font button and choose the font, style and size. The prediction box automatically changes size with any font changes.
Display synonyms turns the display of synonyms On/Off. (Default = ON)
Display usage examples turns the display of usage examples On/Off. (Default = ON)
Order of predicted words
Most likely shows predicted words in most likely order. (Default)
Alphabetical shows predicted words in alphabetical order.
Layout
Vertical list displays predicted words vertically, which is generally easier to read. (Default)
Horizontal list displays predicted words in a single row.
Position of List
Follow text cursor displays predicted words following the text insertion cursor as you type. (Default)
Leave in place displays predicted words at a fixed location as you type. You can drag the list to another location using the title bar that is shown only when this option is selected.
Select Prediction... from the Options menu. Then click Prediction tab.
Word prediction
Predict new words that I use enables WordQ to automatically add correctly spelled words to your vocabulary. Novel and misspelled words are put aside for you to review. See Review misspelled or unrecognized words above. (Default = ON)
Predict words from the WordQ Dictionary suggests words from the WordQ Dictionary when appropriate words cannot be found in your vocabulary. (Default = ON)
Predict next words displays the words that are most likely to follow the word you have just selected. (Default = ON)
Adapt predictions based on how I combine words enables WordQ to learn which words you use to follow one another. If you have trouble with grammar, you may want to leave this option unchecked. (Default = OFF)
Predict words based on creative spelling enables WordQ to consider creative spelling when making its predictions. Whenever there are no words in WordQ’s dictionary beginning with the letters that you type, WordQ will suggest words that take into consideration possible spelling/typing mistakes. Also, when you highlight a word, creative spelling will be considered when predicting words, i.e., spell checked. (Default = ON)
Following a word prediction
Add spaces and adjust punctuation. You can choose to let WordQ automatically add a space after you select a predicted word. When you type a punctuation mark, WordQ will remove this training space, place the punctuation and add any necessary spaces. (Default = ON)
You may also choose to:
- Add 1 space after you end a sentence. This is the common rule with computer fonts. (Default)
- Add 2 spaces after you end a sentence.
Capitalize the first word of the next sentence. This option is only available when the previous option is selected, and only works if you immediately begin typing the next sentence after typing an end-of-sentence mark. (Default = ON)
To keep your vocabulary from learning new words:
- Uncheck Predict new words that I use
- Uncheck Adapt predictions based on how I combine words
To predict words from only your vocabulary:
- Uncheck Predict words from the WordQ Dictionary
Select Prediction... from the Options menu. Then click Selection tab.
Keyboard selection
Select by number enables selection of predicted words by either the number line or numeric keyboard. (Default = ON)
- Use the number line uses the numbers above the letters to select predicted words. (Default)
- Use the numeric keyboard uses the numbers on a numeric keypad (on extended keyboard) to select predicted words.
Mouse selection
Point and click to select a word enables selection of predicted words by a mouse/trackpad. (Default = ON)
Personalize Speech Feedback
Select Speech Feedback... from the Options menu. Then click Voice tab.
To adjust the voice:
Volume adjusts the speech volume. The maximum volume is the current Windows volume setting.
Reading Speed adjusts the reading speed of the selected voice.
To change the reading voice:
- Choose from the list of available voices.
- Click Try button to hear how the voice sounds with its selected settings.
Select Speech Feedback... from the Options menu. Then click Feedback tab.
To hear what you type:
Speak letters helps you confirm which character you have typed. Each letter is spoken as you type it.
Speak words helps you detect spelling errors. Each word that you type or select is spoken.
Speak sentences helps you hear the word flow in a sentence to decide whether the proper words and punctuation have been used.
To hear predicted words:
- Select Read word predictions to hear predicted words spoken when you point to them.
To hear menus:
- Select Read menus to hear items spoken when you point to them. This includes items in pop-up menus.
To hear file names, buttons, options and other window text
- Select Read file names, buttons, options and other window text to hear the names of these objects. This includes desktop icons and file lists.
Select Speech Feedback... from the Options menu. Then click Pronunciations tab.
Change pronunciations of certain words (e.g., your name) if the current pronunciation is inaccurate.
Simply spell the exception as you think it should be spoken.
To share your word pronunciations:
- Choose Export .pxn to export your abbreviation-expansions to share with another user.
- Choose Import .pxn to import a vocabulary that has been saved using the Export .pxn function (only).
Use Speech Recognition
WordQ's speech recognition benefits a wide range of users, from those with severe spelling and writing difficulties to those who simply have to write a lot. For some people it is a way of finally being able to communicate in writing, for others it is a simple tool for a busy life.
You can do everything that WordQ does, plus you can write by speaking. At any time you have the choice of typing with the keyboard, using word prediction, or speaking straight into your text. Speech recognition and word prediction are integrated to enhance the effectiveness of each other.
Your WordQ speech recognition offers several unique features:
- simplified training with speech prompting
- speech feedback of recognized words and phrases
- seamless integration with word prediction
- a choice of discrete (Speak and Select) or continuous dictation (Speak Continuously)
- no voice commands (just text and punctuation)
You can train WordQ to recognize your speech using texts provided that match your reading level or you can write your own training texts.
Once you have finished training, you can dictate words or phrases directly into your documents similar to other speech recognition software. You can also use unique speech-enabled word prediction. Here, spoken words are displayed as a list of choices enhanced by word prediction. You then choose from the prediction box using the keyboard or mouse, or type letters to further refine the suggestions.
Recognized words and phrases are immediately read aloud to help you identify mis-recognitions. To help you make any corrections, highly accurate word predictions are suggested by combining speech with predictive information. As a result, the desired word can be selected with a minimum number of keystrokes.
It may take you some time to work out for yourself how to balance typing with speaking. Everyone is different.
Dictation Options
WordQ offers two dictations modes, Speak and select and Speak continuously. Associated with these is an option to limit single-word recognition to only words from your WordQ vocabulary.
Microphone on/off settings
From the Options>Speech Recognition... dialog you can choose to have the microphone automatically turn off while editing, after every recognition, or never.
Turn mic off: while editing (default)
The microphone automatically turns off whenever you: click with the mouse; use the , or (arrow) keys or press Esc. This allows you to make edit without worrying about unwanted recognitions being inserted. Click on the Mic button or press F8 to turn the microphone on again when needed.
Turn mic off: after speaking
This is useful when you occasionally use speech recognition. Turn on the microphone when you want to insert a word or phrase and then the microphone turns itself off.
Turn mic off: never
The microphone will stay on until you manually turn it off.
Immediate undo
Press Esc to immediately undo any text entered in your document through speech recognition.
No speech commands
WordQ's speech recognition focuses on recognizing words for writing only. There are no speech commands (e.g., command and control, selection, correction, editing, selection, navigation, capitalization) to get confused with your writing. However, a limited set of punctuation marks can be used (see Tips).
Recognition speech feedback
When first installed WordQ will speak back whatever is recognized.
You can turn this off by unchecking Speak words in the Options>Speech Feedback...>Feedback dialog.
It is very important to take care of your voice when you are using speech recognition.
If you have frequent hoarseness, loss of speech, sore throats, pain or discomfort when speaking, or if speaking starts to require significant effort, do not use speech recognition. If these problems persist and are not associated with a cold or other illness, please contact a speech-language pathologist or an ear, nose and throat specialist.
We recommend the following when using speech recognition:
- Speak in your natural speech. Speak the same way you would to a person sitting right in front of you. Do not whisper, speak extra loudly or put extra emphasis on words.
- Relax. Stay relaxed when using the system. Make sure that you are sitting comfortably and able to maintain good posture.
- Breathe in through your nose. This helps prevent dryness. Do not breathe too shallowly or exaggerate your breathing. Keep your shoulders down.
- Take frequent breaks. Take a break of at least 10 minutes every 30 to 60 minutes, or more often if required. During your breaks drink water, and relax.
- Drink water frequently. Drink water throughout use of speech recognition, not just during breaks. Small sips of water help prevent dryness.
- Speak with varied intonation. Using intonation (i.e., a sing-song pattern in your voice) will help you vary your pitch and avoid speaking in a monotone, which can stress your voice.
- Humidify the room. Ensure that the environment in which you are speaking is not too dry. Use a humidifier if necessary.
- Keep dust to a minimum. Dust can irritate your throat.
- Limit use when feeling ill. Don’t do too much speech recognition if you have a cold or are feeling ill. Pay extra attention to how your speech sounds and how your throat feels. Take more breaks and drink more frequently. Try not to speak as much as usual.
AVOID
- Smoking. Speech recognition should be used in a room that is free of smoke. Smoking is not recommended for speech recognition users.
- Throat clearing. Many people are not aware that they frequently clear their throat when talking. When you feel the need to clear your throat, take a drink of water and swallow hard instead.
- Excessive coughing. If coughing is unavoidable, do this as gently as possible.
Recognition: Training
It’s a good idea to read the whole of this section before you start the training – that way you will know what to expect and your training will be more successful.
Before using speech recognition you must create a recognition profile and train it so that WordQ recognizes your speech. You will read several training texts aloud. Each involves speaking for about 2 – 5 minutes. You will need to do several of these, with breaks in between, so that speech recognition can work more accurately. (You need to train at least 800 – 1,000 words, or about 15 minutes of your speech for best results.) If you find that recognition is poor when you come to dictating, then do some further training, preferably with text that is similar to what you want to write (see Create your own training text).
Note: The speech training interface described below has been designed for a user who has difficulty with reading. If this is not your case, you can use the standard Microsoft speech training wizard located under Start>Control Panel>Speech. This wizard allows somewhat faster training without speech prompting.
Step 1: Connect your microphone
- You must connect to your computer a quality noise canceling microphone (certified for speech recognition). A USB microphone is often best. Consider using a headset microphone with earphones that allows you to hear the speech feedback privately without disturbing others. You may also use a directional desktop microphone and desktop speakers if you are using the computer in a quiet environment. (In a classroom, it is suggested that you sit at the back facing the front of the class so that the microphone does not pick up sounds from the teacher or other students.)
- You should not change your microphone once you have trained with it. If you do change microphones, or change location, then you should create a new speech profile for each situation and repeat training in each. There are no limits on the number of speech profiles that you may create.
Step 2: Do a quick test of your microphone
- Choose Speech recognition...> from the Options menu.
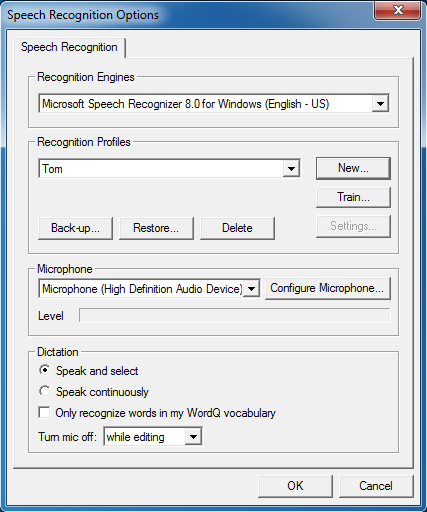
- Speak a phrase. You should see a moving horizontal green bar displayed in the microphone section. If you do not see this moving bar while speaking, make sure that your microphone is connected and that the correct microphone is selected from the drop-down list in this section. (You may have several possible microphones listed.)
Step 3: Choose the recognition engine
Ensure that only a Microsoft English Recognizer is chosen.
- Choose Microsoft Speech Recognizer 8.0 for Windows. WordQ will not work with any non-Microsoft recognition engine that may be displayed.
Step 4: Create a speech recognition profile
- Click the New button in the Speech recognition dialog to create a new recognition profile.
- Enter a name for your profile, such as your personal name (e.g., Tom) and click OK. This name will now appear in the list of recognition profiles.
Step 5: Read your sentence
- A microphone wizard will then be displayed to adjust the volume of your microphone.
Click Next> on the first page to display the page below.
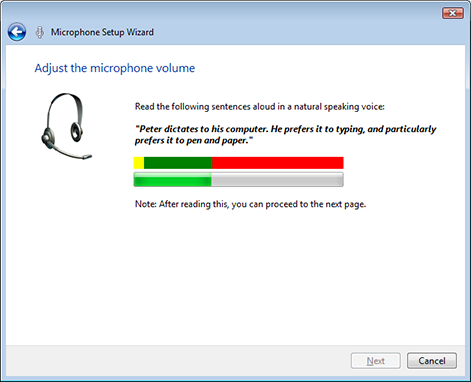
- When you are ready, speak a sentence. (You can read the sentence shown, or you can make up your own.) Speak normally. The system will automatically adjust the volume of the microphone as you now speak.
- Pause after you speak and the Next> button should become available which you should now click. If it is not available, speak another sentence and pause.
- The next step in the wizard tests your speakers/headset. In this step, speak a sentence and then pause. You should hear whatever you said through the speakers/headset. If you don’t hear anything, check to make sure they are plugged in, powered and turned on (if necessary), and the volume adjusted. Click Next> when satisfied.
Step 6: Train your speech
- Click the Train... button in the Speech recognition dialog to begin training your recognition profile.
- You will first be prompted to choose a training text. Choose a text that is at an appropriate level (beginner, intermediate, or advanced) and in an area of interest to you. (See also Creating your own training texts.)
- A training window will now be displayed. The upper portion of the window will display the training text, one phrase at a time.
- Click on the Train button to begin your training. You will see a short piece of text at the top of your screen. It will be read to you and highlighted word-by-word. When the highlighting stops and the ‘go’ icon
 appears at the top of the training window, say the phrase into your microphone.
- Note It is necessary to wait for the highlighting to stop before you speak – the microphone automatically turns off while SpeakQ is highlighting the text so it won’t ‘hear’ you. Speak in your normal voice – not too fast, slowly, loud, or quietly.
- Note It is necessary to wait for the highlighting to stop before you speak – the microphone automatically turns off while SpeakQ is highlighting the text so it won’t ‘hear’ you. Speak in your normal voice – not too fast, slowly, loud, or quietly.
- After you speak, the computer will write down what you have said in the bottom section of the training window. Once the complete phrase is recognized, you will be prompted with the next phrase. After a while you should find that you develop a rhythm of reading/listening and speaking – your training should then go quite smoothly.
- If you do not say everything or the computer does not recognize your voice, do not worry. After a short pause, the computer will say any remaining words again.
- Take a break whenever you need one by clicking on Pause. Click Train to continue with training. If you get stuck on a word and it is not recognized, just click on Skip to skip that word.
- If you happen to say the wrong word, and the computer thinks it is correct, do not stop. Just continue with the training. You do not have to make any corrections now.
- Along the bottom of the window you will notice a progress bar that indicates your progress through the training. When all of the text is trained the SpeakQ training window will close and save your trained profile.
Step 7: Repeat training
Repeat this training procedure with more training texts. At least three of the full training texts (i.e., all parts) provided should be trained. This is about 800 – 1,000 words, or about 15 minutes of your speech. You can take a break between trainings or do them on different days. The recognition will improve with more training.
At first, you may be disappointed with recognition in comparison to the training where the training text is known in advance and your recognition appears perfect. In actual use, the computer does not know what you are saying in advance. With practice, the recognition will improve. You will also learn how to dictate more comfortably leading to better recognition.
Additional training may be required if you are not satisfied with the recognition, preferably with text that is similar to what you want to write (see Create your own training texts).
With time, you will work out your own strategy for combining speech with typing and word prediction.
You can create your own training text files from samples of your own writing or from any other source. Training texts are simply text files, created in the word processor of your choice, using text characters only ( i.e., no numbers) and simple punctuation. These are then saved in text-only format with a “.txt” extension.
- Find or write your piece of text. Press Enter after each sentence to separate it from the next.
- Break each sentence into ‘chunks’ (5 or 6 words per chunk is a good average but you can choose how many or how few you have).
- Type out your text, inserting the # symbol after each chunk.
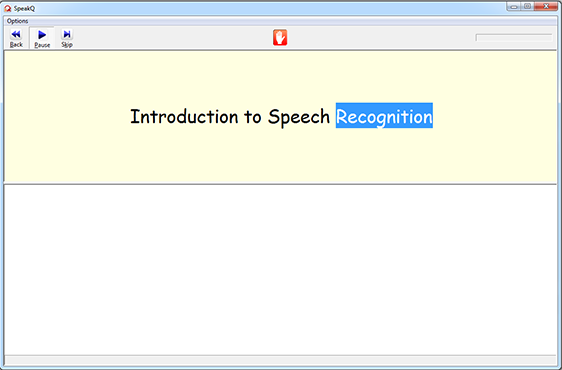
- This is an example of how a training text file might look:
Introduction to Speech Recognition
Please repeat what the computer says.
Speak clearly in your normal voice.
Do not talk too fast,# or too slowly.
After you speak,# the computer will write down# what you have said.
If you do not speak everything,# do not worry.
The computer will speak# any remaining words again.
This speech training# will help the computer# better recognize your voice.
- Save your training text in a text-only format in a folder such as ...(My) Documents\WordQ4
It is recommended that you back up your recognition profile immediately after you have completed training it. This profile is separate from your user vocabulary, although the name of your current profile is recorded with your vocabulary. You should also back up your recognition profile on a regular basis.
Hint: Consider using a different file name each time that you back up your recognition profile ( e.g., Tom1, Tom2, Tom3). Then, if something goes wrong with your recognition profile, you can then recover to a time when it was working without having to redo all of your training.
Backing up a recognition profile
- Select Speech Recognition... from the Options menu.
- Choose the recognition profile that you wish to back up.
- Then click the Back-up button. A Save As dialog will be displayed.
- Enter a name for the back-up file. It will then be saved in a compressed format with a “.pfr” extension under
...(My) Documents\WordQ4. You can transfer a back-up file to another computer by copying it to a USB “thumbdrive” or by burning it onto a CD.
Restoring a recognition profile
- Select Speech Recognition... from the Options menu.
- Choose the recognition profile that you wish to back up.
Then click the Restore button. An Open dialog will be displayed.
- Locate and select the desired back-up file (with a “.pfr” extension).
You will then be prompted to enter a name for the profile to restore.
- You can:
• accept the default name which is the same as the file name
• type an existing name in the recognition profile list; or
• type a new name
- Note: Be aware that every computer is different and that a recognition profile may not work as well if restored on a different computer than the one on which it was created.
Recognition: Speak and Select
Speak and Select is one of two available speech recognition modes with WordQ. Here, spoken words are displayed as a list of choices enhanced by word predictions. You then select from the list of words or phrases (using the keyboard or mouse), or type letters to further refine the suggestions.
When WordQ is first installed, Speak and Select mode is automatically chosen. You can manually choose this mode by choosing Speech Recognition... from the Options menu and then select it under Dictation. This dialog also includes an option to limit single-word recognitions to only words from your vocabulary.
Step 1: Start a writing application
- Start a writing application such as Microsoft Word. The prediction box will appear as you normally have it set.
Step 2: Turn on microphone
- Turn on the microphone by clicking the Mic button or by pressing F8.
Step 3: Speak a word or phrase.
- Speak a word or short phrase. Notice that while the computer is recognizing your voice, an ellipsis (...) is shown in the prediction box. After you pause, your recognized text is displayed and the most likely recognition will be spoken.
- If you speak a single word, you may see several similar sounding words.
- If you speak a short phrase, you may only see a single recognized phrase. It is suggested that you speak in short phrases (3 – 5 words).
- At this point, it is suggested that you simply practice speaking and reviewing the recognized words or phrases.
- You can hear each word or phrase in the prediction box by using the usual WordQ method of pressing the (down arrow) key or mousing over the words. When listening to the words, you can select them with the Enter key or by clicking them.
- Note: Only words contained within your WordQ user vocabulary are suggested in the Speak and select mode.
- You can increase the accuracy of recognition by typing a single letter to limit the suggested recognized words to those beginning with that letter.
Step 4: Select a word or phrase
- If the word or phrase that you want is in the prediction box, you can select it as you would with any predicted word. If your word or phrase is not shown, speak again.
- As soon as you select a word or phrase, it will be typed into your application. It will also be spoken aloud.
Step 5: Correcting within a recognized phrase
- WordQ temporarily remembers whatever you just said and makes those words available for you to use as word predictions. You can then quickly re-create the original phrase in a few keystrokes when changing/adding/deleting one or two words.
- For example, consider having to change the word “is” to “was” if the phrase “this is going to be difficult” is shown in the prediction box.
- Instead of selecting the phrase in the prediction box, begin typing, i.e., start with the letter “t.” The word “this” will be at the top of the predicted list. Select it and “is” will be at the top of the next predicted list. At this point, select “was” from the list instead of “is.” (If your desired new word is not shown, type one or more letters until it is shown and select it.) Then the words “going; to; be; difficult” will be at or near the top of each subsequent list.
Step 6: Adding punctuation
In the Speak and Select mode, you must type punctuation marks rather than speak them.
Recognition: Speak Continously
Speak continuously is the second of two available speech recognition modes with WordQ. Here, your spoken words are typed directly into your document as you say them.
You can manually choose Speak Continuously by choosing it under the Dictation section of the Options>Speech Recognition... dialog. This dialog also includes an option to limit single-word recognitions to only words from your vocabulary.
Step 1: Start a writing application
- Start a writing application such as Microsoft Word. The prediction box will appear as you normally have it set.
Step 2: Turn on microphone
- Turn on the microphone by clicking the Mic button or by pressing F8.
Step 3: Speak a phrase
- It is recommended that you speak in short phrases. While you can speak individual words, recognition accuracy is better with short phrases. Notice that while the computer is recognizing your voice, an ellipsis (...) is shown in the prediction box (if visible) and in WordQ’s titlebar.
- After you pause your recognized text is immediately written down in your document and spoken out.
Step 4: Correcting within a recognized phrase
- There are three ways to make corrections:
- use the keyboard and type over any errors;
- press Esc to quickly undo the recognized phrase and speak the phrase again; or
- press Esc to quickly undo the recognized phrase and use speech-enabled word prediction.
- In this last method, WordQ temporarily remembers whatever you just said and makes those words available for you to use as word predictions. You can then quickly re-create the original phrase in a few keystrokes when changing/adding/deleting one or two words.
- For example, consider having to change the word “is” to “was” if the phrase “this is going to be difficult” has been recognized and typed out.
- After pressing Esc to quickly undo the recognized phrase you will notice that the word “this” is immediately at the top of the predicted list. Select it and “is” will be at the top of the next predicted list. At this point, select “was” from the list instead of “is.” (If your desired new word is not shown, type one or more letters until it is shown and select it.) Then the words “going; to; be; difficult” will be at or near the top of each subsequent list.
Step 5: Inserting punctuation
- You may speak common punctuation marks rather than type them (see Speaking Punctuation).
- It is generally easier to type punctuation on the keyboard. WordQ then automatically adjusts spacing around punctuation marks and capitalizes the first word in a sentence if this option is checked under Options>Prediction...>Prediction.
Step 6: Correcting within your document
- Begin by taking advantage of WordQ’s proofreading features to review your document for any errors. Exit proofreading to make corrections.
- You can review a small phrase by highlighting it and pressing the Read button to hear it spoken.
- You then have a choice of typing over or inserting new text by voice or by keyboard with the help of speech-enabled word prediction. Whenever speech information is available, it will be combined with word prediction when editing individual words.
Step 7: Training new words
- You can add new words with unusual spelling and/or pronunciation, such as proper names.
- Choose Train Word.... from the Options menu.
- Type in your word.
- Click the Record Pronunciation button and speak the word clearly. Once recorded, the word will be added to the Dictionary list. You may add as many new words as you wish now or at a later time. Close this dialog when done.
- Choose Train Word.... from the Options menu.
- Note: Training new words does not add those words to your prediction vocabulary if they are not already included. Manually add them to your vocabulary through the Options>My Words... dialog if necessary.
To write Say
. Period
, Comma
: Colon
; Semi-colon
? Question mark
! Exclamation point
& Ampersand
@ At sign or at
\ Backslash
/ Slash
- Hyphen
-- Dash
= Equals
+ Plus sign
# Pound sign
% Percent sign
$ Dollar sign
“ Quote