Writing with WordQ
WordQ for Chrome™ includes an easy-to use document editor and a fully accessible PDF viewer/editor with the support of word prediction, speech feedback, speech recognition, customizable static topics, ThoughtQ dynamic topics, and proofreading.
The document editor functionality is described here.
Note: WordQ can run offline after it has been started while online. However, you must be online to save/open documents with your Google Drive™ account, to use speech recognition, to get topic word definitions as well as discover information about these words as they relate to a topic using Google, and to receive updates.
Note: When used within Chrome on MacOS, the command key ⌘ is used instead of the CTRL key.
![]() Options: Show/hide Options to customize WordQ.
Options: Show/hide Options to customize WordQ.
![]()
![]() CTRL (⌘) + 7 Microphone: Turn microphone on/off for speech recognition.
CTRL (⌘) + 7 Microphone: Turn microphone on/off for speech recognition.
![]()
![]() CTRL (⌘) + 8 Words: Show/hide word predictions.
CTRL (⌘) + 8 Words: Show/hide word predictions.
![]()
![]() CTRL (⌘) + 9 Speech: Turn speech feedback on/off.
CTRL (⌘) + 9 Speech: Turn speech feedback on/off.
![]()
![]() CTRL (⌘) + 0 Read: Start/stop reading selected text.
CTRL (⌘) + 0 Read: Start/stop reading selected text.
Color Filter: Turn color filter on/off.
Static Topics: Show/hide customizable static topics.
ThoughtQ: Show/hide ThoughtQ dynamic topics.
Under the File menu select New Document.
Your current document will be replaced with a new blank document. Be sure to save your previous document before opening the current document. (See Save your document below.)
To use word predictions
- As you type, word predictions are displayed along the bottom of the window. Creative spelling is considered. Type the number to the left of your desired word or mouse over and click to select. If your desired word is not shown, continue typing.
- Browse and hear predicted words with the keyboard by holding CTRL (⌘) + →. Press RETURN to select a word and cancel browsing. Press ESC to cancel browsing without selecting, or continue typing.
- To see different endings or inflections select a partial word, e.g., start. Then press DELETE/BACKSPACE to see variations of that word with different endings.
Editing
- Use standard keyboard shortcuts to cut (CTRL (⌘) + X), copy (CTRL (⌘) + C) and paste (CTRL (⌘) + V) text, or the Edit menu. You can also cut, copy and paste text to and from any other document.
- Use standard keyboard shortcuts, the Format menu, or menubar buttons to bold, italicize, or underline text. You can also change the text alignment and add bulleted or numbered lists.
Type numbers
- Click the Word prediction
 button (CTRL (⌘) + 8) to temporarily turn off prediction to type numbers.
If you select the wrong predicted word by mistake, you can quickly undo it by pressing ESC. The last word will be erased, and you can now select the correct word or continue typing.
Usage examples are provided to help distinguish close-sounding words (including homonyms).
A triangle symbol beside a suggested word indicates that there is a usage example available for that word.
Move over a predicted word and pause to see/hear the usage example.

Move the cursor anywhere within your document and click for in-context word prediction.
Suggested words will appear based on the cursor location.
There may also be a usage example to assist you with the selection.

Speech is turned on by default. Click the Speech ![]()
![]() button (CTRL (⌘) + 9) to toggle speech playback on/off.
button (CTRL (⌘) + 9) to toggle speech playback on/off.
Words typed or selected from the prediction list will be read aloud.
As you complete each sentence by adding punctuation it will be read back to you when you enter <space>.
See Options: Speech Feedback for choosing what text you want spoken.
Select your text that you want spoken. Click the Read ![]() button (CTRL (⌘) + 0) to have it read out loud.
button (CTRL (⌘) + 0) to have it read out loud.
At any time while your text is being read aloud, you can turn off the reading by clicking the Read ![]() button (CTRL (⌘) + 0) again or within your document.
button (CTRL (⌘) + 0) again or within your document.
See Proofreading below for a more advanced way of listening to your text.
See Options: Speech Feedback for choosing the voice that you want. Voices that support word-by-word highlighting are indicated by *.
Within WordQ's document editor, Google's browser spell checking is available, if enabled in the Vocabulary Language dialog (See Options).
The browser's language and input settings must be configured to match your vocabulary language, and Spell Check must be enabled.
When Spell check is enabled, incorrectly spelled words will have a color squiggle underline. Right-click the word to see and choose a correctly spelled word, or use a WordQ word prediction.
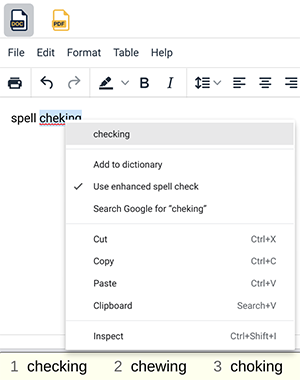
Note: It may take a minute or more after starting WordQ on a Chromebook before spell checking starts.
Chrome setup
- In Google Settings (chrome://settings) choose Advanced settings.
- Under Languages and inputs click on Languages.

- Ensure your Device language matches your vocabulary language. If not, click on Change to change your device language.
Under Web content languages, ensure the language at the top of the list matches your vocabulary language. If not, click on the menu button to move a language up or down the list. Or, click on Add languages to add the appropriate language.
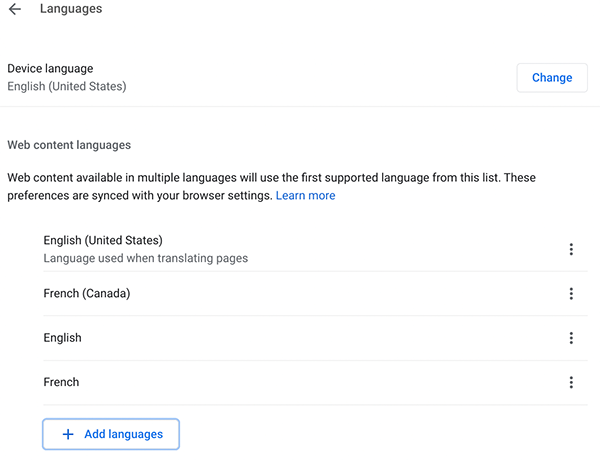
- Under Languages and inputs click on Inputs.

- Under Input methods, ensure the language at the top of the list matches the language of the keyboard that you use and is Enabled. If not, you can remove the listed language and add another as necessary. Note that this affects what letters are shown when you type on the keyboard.
Ensure that Spell check is enabled.
Ensure that Spell check languages is enabled and matches your language preference set in the previous Languages dialog.
You may also enable Enhanced spell check in Chrome browser.
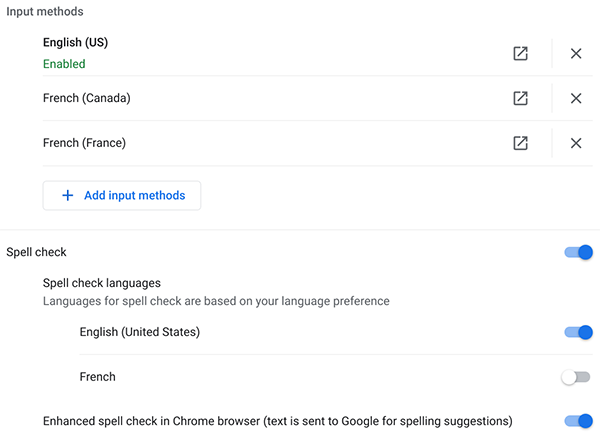
Note: You can use Google spell check in multiple languages on the Chromebook.
Mac OS setup
- In Google Settings (chrome://settings) choose Languages under Advanced settings.
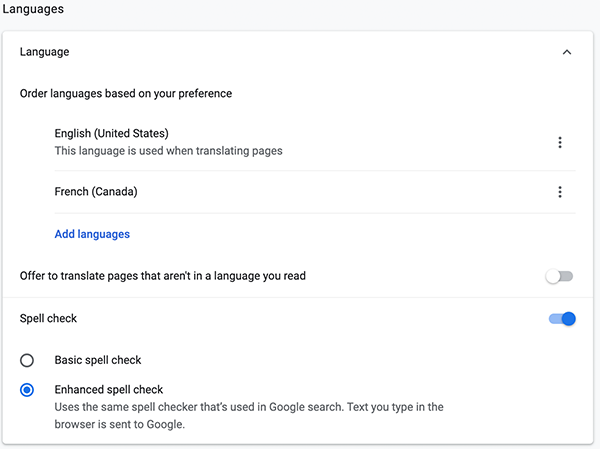
Ensure the language at the top of Order languages based on your preference matches your vocabularylanguage. If not, click on the menu button to move a language up or down the list. Or, click on Add languages to add the appropriate language.
Ensure that Spell check is enabled.
You may choose either Basic spell check or Enhanced spell check.
PC setup
- In Google Settings (chrome://settings) choose Languages under Advanced settings.
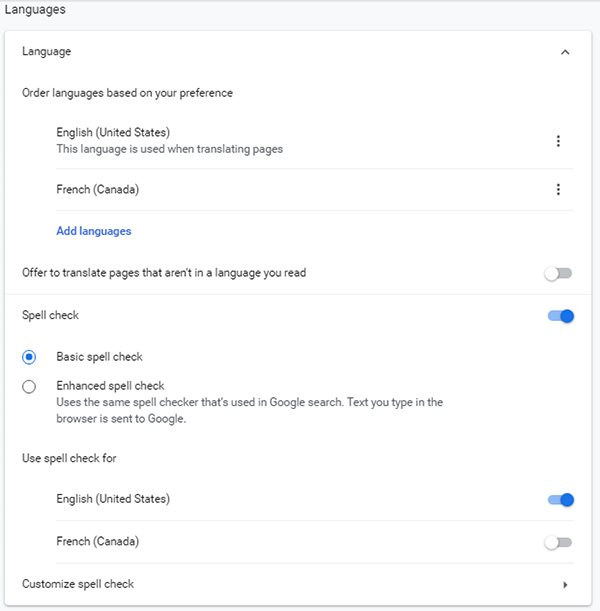
Ensure the language at the top of Order languages based on your preference matches your vocabularylanguage. If not, click on the menu button to move a language up or down the list. Or, click on Add languages to add the appropriate language.
Ensure that Spell check is enabled.
You may choose either Basic spell check or Enhanced spell check.
Under Use spell check for ensure that your desired language for spell checking is enabled.
Note: You can use Google spell check in multiple languages on the PC.
WordQ uses Google Voice Typing for speech recognition. It is intended just for entering text.
At any time, you have the choice of typing with the keyboard, using word prediction, or speaking straight into your text. You must be connected to high-speed internet.
Note that there are no speech commands (e.g., command and control, selection, correction, editing, etc.) to get confused with your writing.
Set up
- Ensure high-speed internet.
- Open Options>Speech Recognition dialog. Choose your Language for recognition. You may choose Australia, Canada, India, New Zealand, South Africa, United Kingdom, or United States.
- Configure microphone use. Open Options>Speech Recognition dialog. By default, the microphone turns off after every recognition. You can choose to have the microphone automatically turn off while typing/editing, after every recognition, or never (i.e., continuous recognition).
- Configure speech feedback. Open Options>Speech Feedback dialog. By default, recognized text is spoken back. Speech recognition is temporarily turned off during speech feedback.
Speaking
- Turn on microphone by clicking the Mic
 button (CTRL (⌘) + 7).
- Speak a short phrase after the Mic button changes to waiting
 . Speak as clearly as possible and not too softly. Recognition is best with short phrases (maximum 30s).
- Recognized text is spoken back if speech feedback turned on.
- Undo a mis-recognized phrase by pressing ESC.
- A limited set of punctuation may be spoken:
• Period
• Comma
• Question mark
• New Line
• New paragraph
See Speech and Speech Recognition under Options below for configuring speech feedback and recognition options.
WordQ includes a color filter that you may choose to use to reduce screen contrast. It is available in six colors and levels of opacity.
- Click on the Color Filter
button to turn it on and off.
- Adjust the color choices and opacity adjustment in the menu Options:Color Filter.
Under the File menu select Open from Google Drive
A dialog display your Google Drive documents that can be opened in WordQ for Chrome. Choose a document.
Someone else may share a document with you (such as a teacher sharing an assignment) that is visible on your Drive with that person as the Owner. They will have chosen whether it is editable or view-only:
1. If editable, then any edits that you make will overwrite the original when saved.
2. If view-only, then you can only view and read the document. To edit it, first save it using Save As... (with a different name) to your Drive. Then re-open it.
Open with >
You can open a document or PDF file from Google My-drive into WordQ after it has been installed.
1. Right-click (or double-tap on touchpad) on a file within My-drive and choose Open with > WordQ.

Under the File menu select Save to Google Drive or Save to Google Drive As...
Name your document. Click OK when done.
Your document will be saved to your Google Drive.
WordQ automatically saves your document as you write. If your computer goes offline, your document will be automatically saved locally.
Under the File menu select Open...
A standard dialog, that varies with operating system (Chrome, Windows, or Mac OS), will be shown for you to choose and open a WordQ document locally or in the cloud.
Note: Offline/cloud documents are saved with the extension .html
Under the File menu select Save or Save As...
A standard dialog, that varies with operating system (Chrome, Windows, or Mac OS), will be shown. Name your document and save to your preferred document location locally or in the cloud.
Note: Offline/cloud documents are saved with the extension .html
Options 
Under the Options menu ![]() select Vocabulary Language.
select Vocabulary Language.
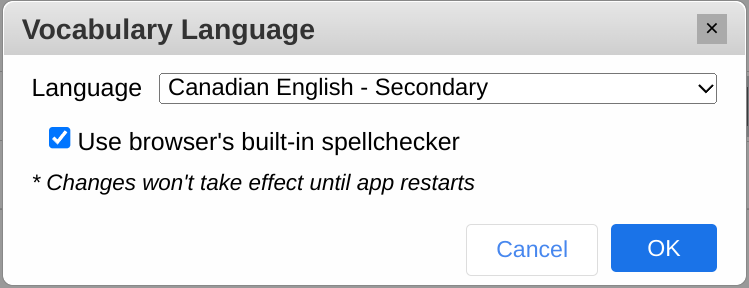
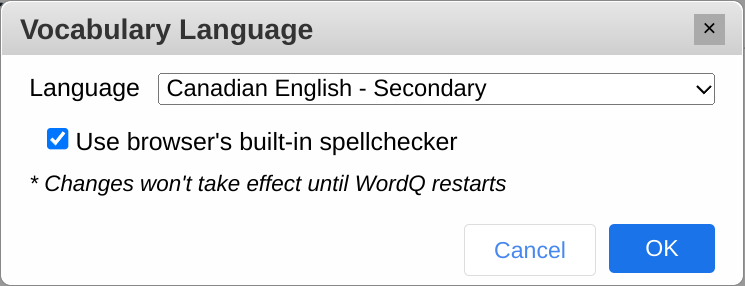
Select a vocabulary language for word prediction.
Note: Changes won't take effect until app restarts.
Under the Options menu ![]() select User Vocabulary.
select User Vocabulary.
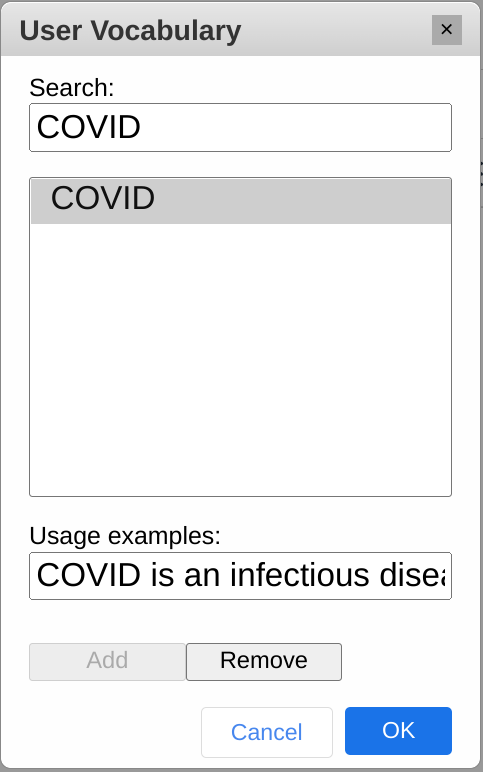
Start by searching for an existing word or type a new word.
- If the word exists, you can edit its usage example.
- If the word is a new word, press Add to add it to your vocabulary. You can also add a usage example.
You can customize a Static topic from a list of words that you add:
• one-by-one
• from a list in a text file
• from text copied to the clipboard, or
• from ThoughtQ
See Topics below for editing a Static topic using one or more of these methods.
Under the Options menu ![]() select Word Prediction.
select Word Prediction.
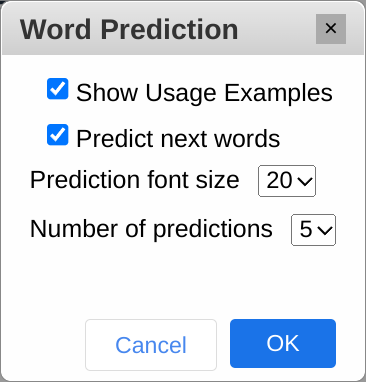
Show usage examples turns the display of usage examples on/off.
Predict next words turns the display of next word predictions, before you type any more letters, on/off.
Prediction font size allows you to adjust the size of the word predictions.
Number of predictions allows you to choose up to 7 predicted words.
Under the Options menu ![]() select Speech Feedback.
select Speech Feedback.
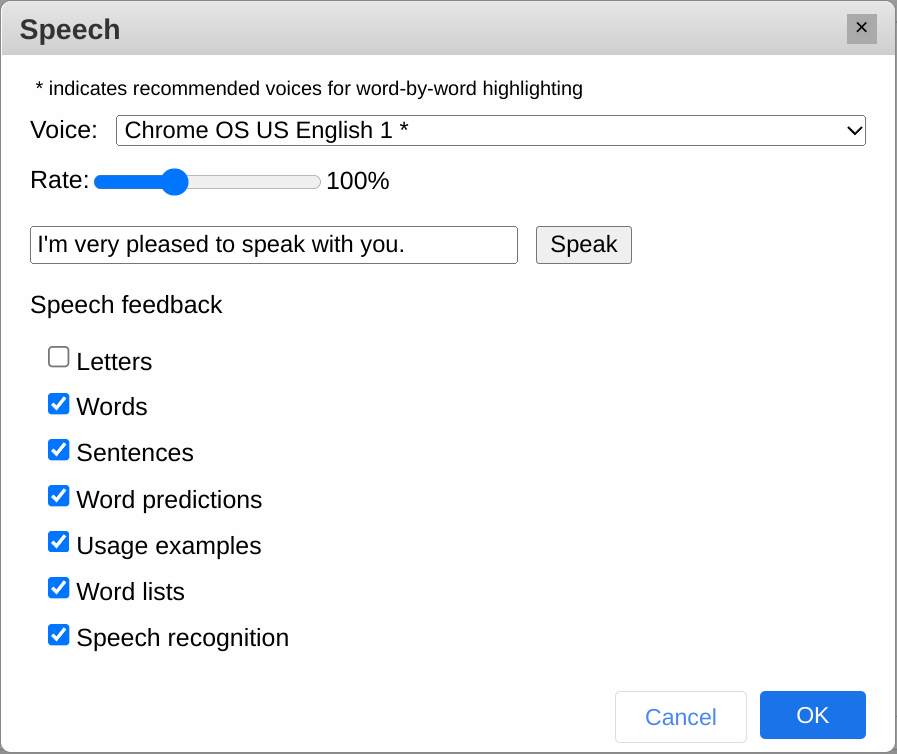
Choose a voice from the drop-down menu. Voices that support word-by-word highlighting while proofreading sentences are indicated by *.
Any combination of these may be used:
- Letters lets you hear, when not paying attention to the screen, whether you typed the correct letter.
- Words lets you hear whether you made the right selection. It also helps you hear spelling mistakes as a word generally won’t sound right if you make a mistake. If vowels are left out, the word will be spoken letter-by-letter.
- Sentences lets you immediately hear how words flow in a sentence to hear whether you made some mistake(s). Also, if you never hear a sentence spoken, that is a cue that you have forgotten to use an ending punctuation.
- Word Predictions lets you hear word predictions to help choose a word.
- Usage Examples lets you hear usage examples to help distinguish close-sounding words including homonyms.
- Word lists allows you to hear any word presented in a list such as a static topic.
- Speech recognition lets you hear what the computer has recognized after speaking and pausing.
WordQ uses Google Voice Typing for its speech recognition.
Microphone on/off settings
From the Options>Speech Recognition... dialog you can choose to have the microphone automatically turn off After speaking, While editing, or Never.

Turn microphone off: Never
The microphone will be active on until you click the Microphone button
(CTRL (⌘) + 7).
Turn microphone off: While editing
The microphone automatically turns off whenever you: click with the mouse; use the ARROW keys or press ESC. This allows you to edit without worrying about unwanted recognitions being inserted. Click the Microphone
button (CTRL (⌘) + 7) to turn the microphone on again when needed.
Turn microphone off: After speaking (default)
This is useful when you occasionally use speech recognition. Click the Microphone
button (CTRL (⌘) + 7) when you want to insert a word or phrase and then the microphone turns itself off.
Language
Select your desired speaking language from the drop-down list.
WordQ includes a color filter that you may choose to use to reduce screen contrast. It is available in six colors and levels of opacity.
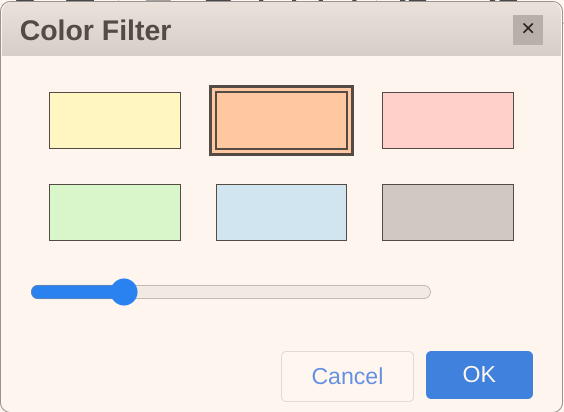
- Click on a color to choose it. Use the slider to adjust its opacity.
- Click OK when done.
Exam Mode turns off WordQ features that may not be allowed during exams/assessments. In particular, those features that may be deemed unfair or allow “cheating.”
A teacher or exam supervisor typically initiates this mode and chooses the time limit.
Prior to starting Exam Mode it is important that the user loads their personal vocabulary and configures their Speech Feedback.
After choosing Exam Mode, a warning dialog will be displayed indicating the following features are turned off and not available:
- Options menu
- Synonyms
- Topics
- Predictive phrases
- Next word predictions
- Word usage examples
- Words added by the user
Choosing the Exam Mode time limit:
- Choose the time limit between 1 and 11 hrs.
- After clicking OK, it is not possible to turn Exam Mode off until the time limit has been reached or the computer is re-started (not logging off/on).
- After the time limit has been reached, the Exam Mode will be cancelled the next time the WordQ is run.
Topics 

A topic is a list of words or short phrases that you might use when writing about a topic. They are emphasized in the word prediction when a topic is active and are shown in the right-hand pane of WordQ as writing hints. Some of these words may be outside of WordQ's regular dictionary.
Within the list you can hear the words spoken, get word definitions, and discover information about these words as they relate to the topic using Google.
The list remains visible when a topic is active to provide an ongoing reference when writing.
WordQ provides two different ways of using topic words:
In both cases, the use and functionality of Topics is the same.
A Static topic is a list of words or short phrases that you create and customize for potential use when writing about a topic. They are emphasized in the word prediction when a topic is active and are shown in the right-hand pane of WordQ as writing hints.
A static topic is created and saved with your profile from a list of words that you add:
• one-by-one
• from a list in a text file
• from text copied to the clipboard, or
• from ThoughtQ
To use a static topic:
- Click on the Static Topic
button and choose a topic from the dropdown list. If no topics are available you will need to create a topic (see Static topics - Create and edit).
- Click back in your writing area and return to typing.
- Notice that topic words are predicted faster and are shown in a blue color.
To turn off a static topic:
- At any time choose another topic, or choose <none> as a topic if you don’t want any topic.
- To hide and turn off Topics click on the Topic
button.
- Click in your writing area and return to typing.
To get a definition of a specific topic word:
- Select a topic word and click the Define
button.
- The default web browser will open with a definition of the word.
To search and discover related information:
- Select one or more topic words and click the Search
button. Use CTRL+click and SHIFT+click for multiple selections.
- The default web browser will open with results related to topic keyword + topic word.
A ThoughtQ dynamic topic is a list of words or short phrases automatically generated from an keyword for potential use when writing about a topic. They are emphasized in the word prediction when the ThoughtQ topic is active and are shown in the right-hand pane of WordQ as writing hints. It can be changed at any time; for example, between sentences or paragraphs. You can also search and discover related information to ThoughtQ topic words through a web search feature.
Although a ThoughtQ topic is not saved with your profile, its topical words can be copied and added to a static topic. See Static Topics - Import Words from ThoughtQ.
To use a ThoughtQ topic:
- Click on the ThoughtQ
button.
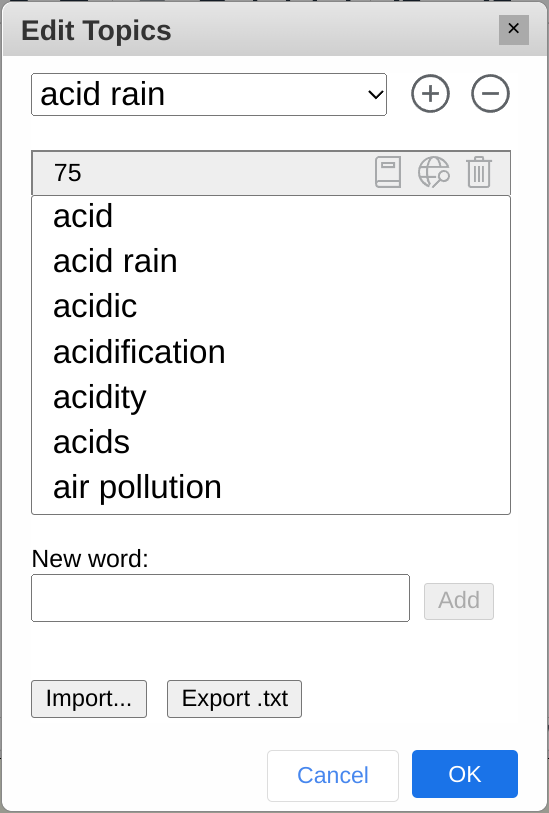
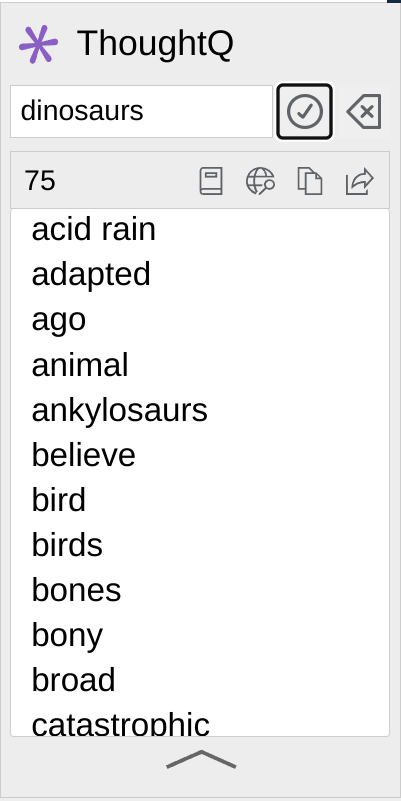
- Type a topical keyword/phrase; e.g., "acid rain" in the top edit box; then press RETURN or click on the OK
button.
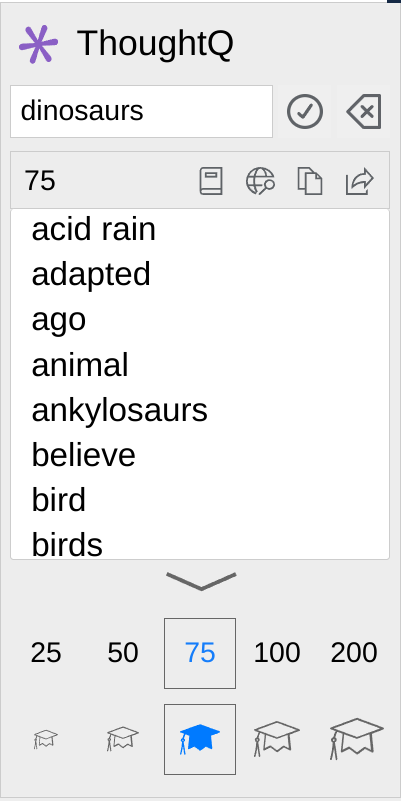
- Initially, 75 topic words/phrases at an average academic level will be displayed. You can change these values by clicking the Up arrow button
to show options. When done, click the Down arrow button
to hide these options.
- Click back in your writing area and return to typing.
- Notice that ThoughtQ words/phrases are predicted faster and are shown in a violet color.
- At any time you can change to new ThoughtQ topic by entering a new topical keyword/phrase.
- Click the Clear
button to clear the dynamic topic words/phrases.
- To hide and turn off ThoughtQ click on the Topic
button.
To get a definition of a word:
- Select a topic word from ThoughtQ and click the Define
button.
- The Google browser will open with a definition of the word.
To search and discover related information:
- Select one or more topic words from ThoughtQ and click the Search
button. Use CTRL+click and SHIFT+click for multiple selections.
- The Google browser will open with results related to topic keyword + topic word(s).
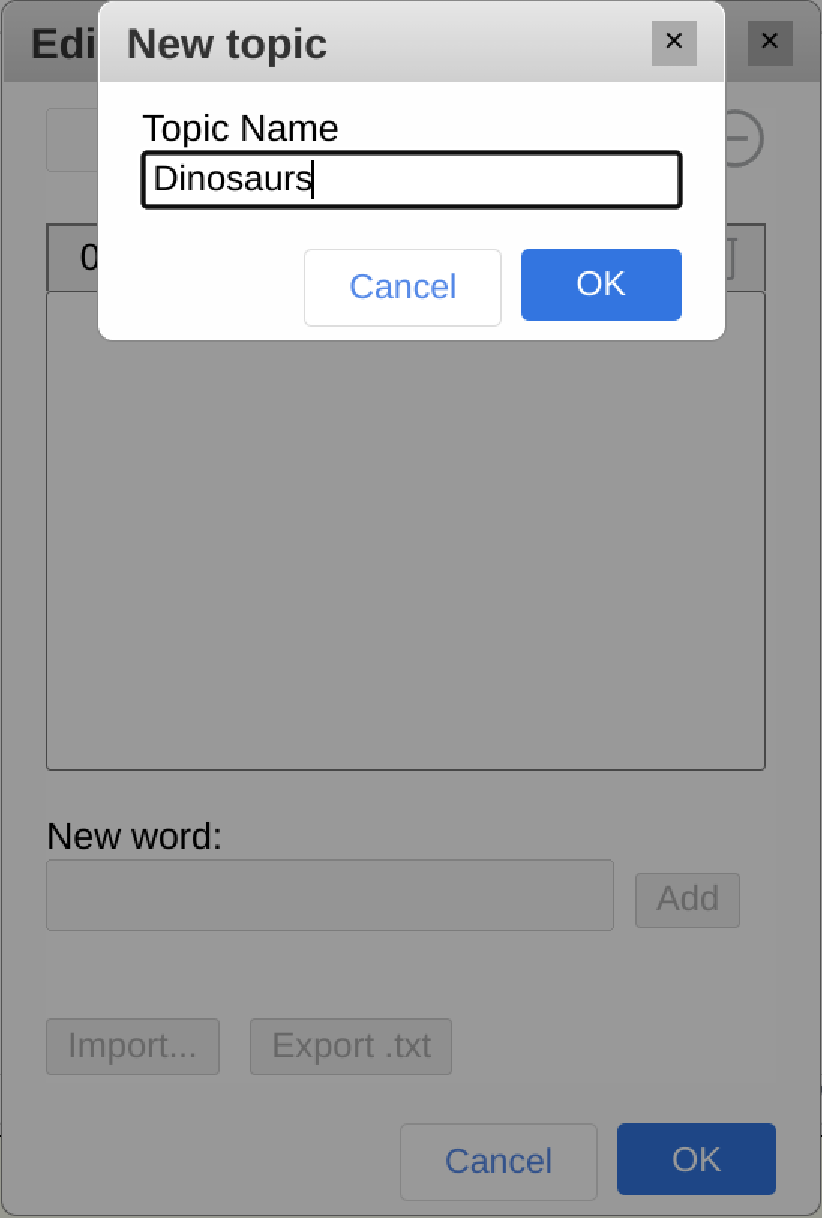
To create a new topic:
- Click Edit Topics at the bottom of the list of topic words.
- In the Edit Topic dialog, click the Add
button.
- Type in a new Topic name and click OK when done.
To delete a topic:
- In the Edit Topic dialog, choose a Topic and click the Remove
button.
To add topic words/phrases one-by-one:
- Click Edit Topics at the bottom of the Topics window.
- In the Edit Topic dialog, type a word or short phrase (up to 45 letters) in the New word box and click Add. The word will be copied to the list above and placed in alphabetical order.
- Repeat for all topic words.
- Click OK when done.
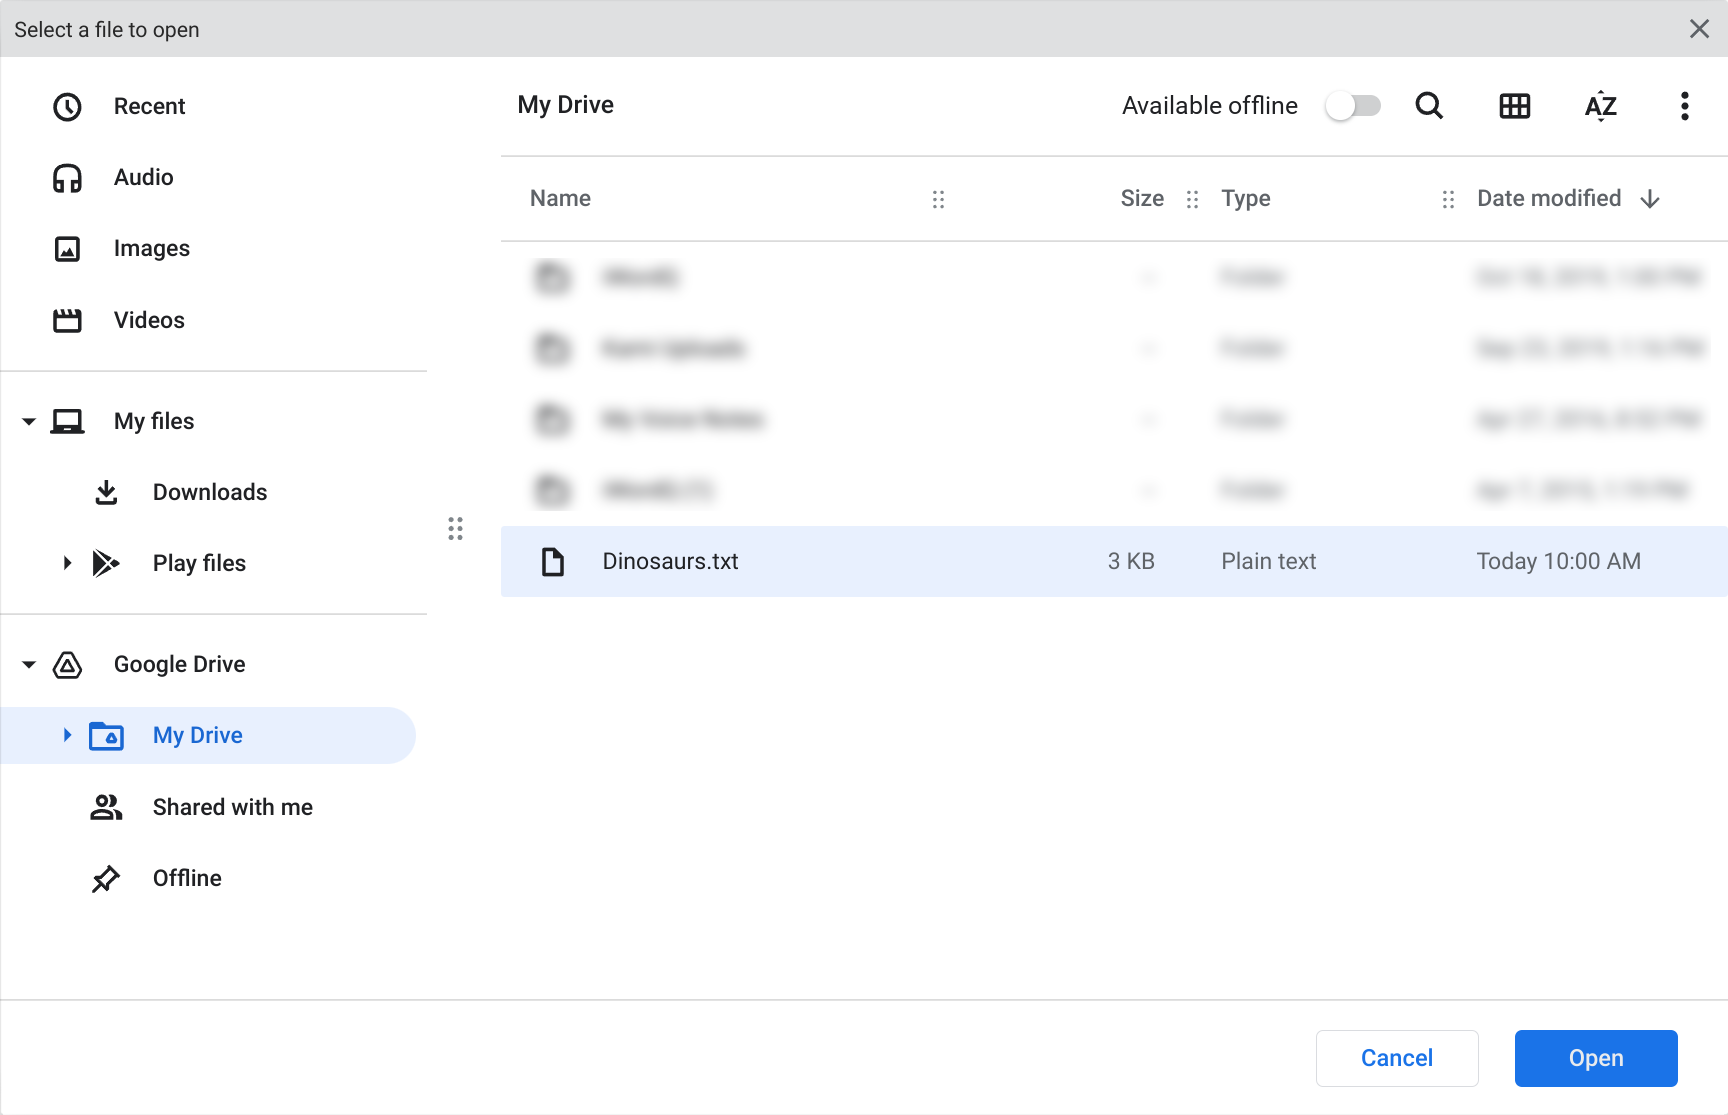
A list of words and short phrases (up to 45 letters) can be imported into a topic if it is saved in a text-only (.txt) file with a RETURN at the end of each line.
To add a list of topic words (or short phrases) from a text file:
- Click Edit Topics at the bottom of the list of topic words.
- In the Edit Topic dialog click the Import... button.
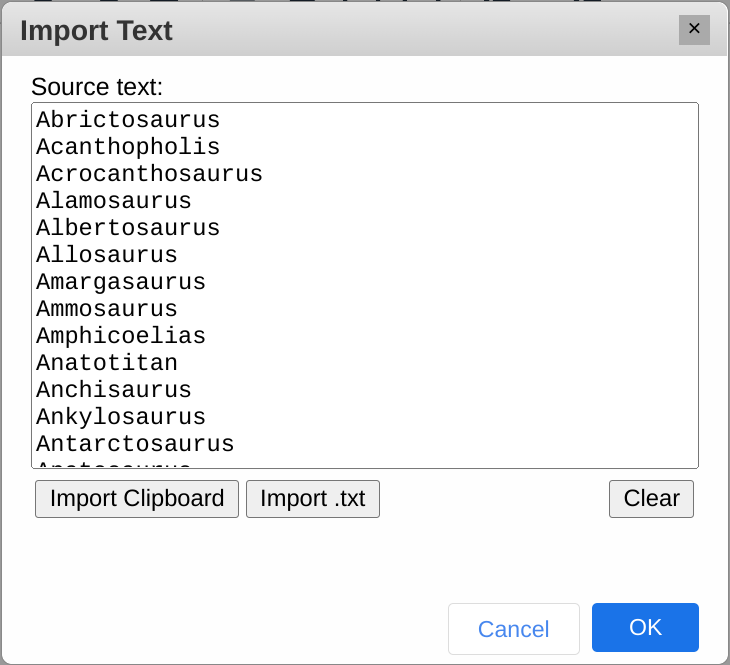
- In the Import Text dialog, click the Import .txt button and locate a text-only file that contains a list of words/phrases, each on its own line. Click OK when done.
- In the Import Text dialog, your imported words/phrases are shown for review. Click OK when done.
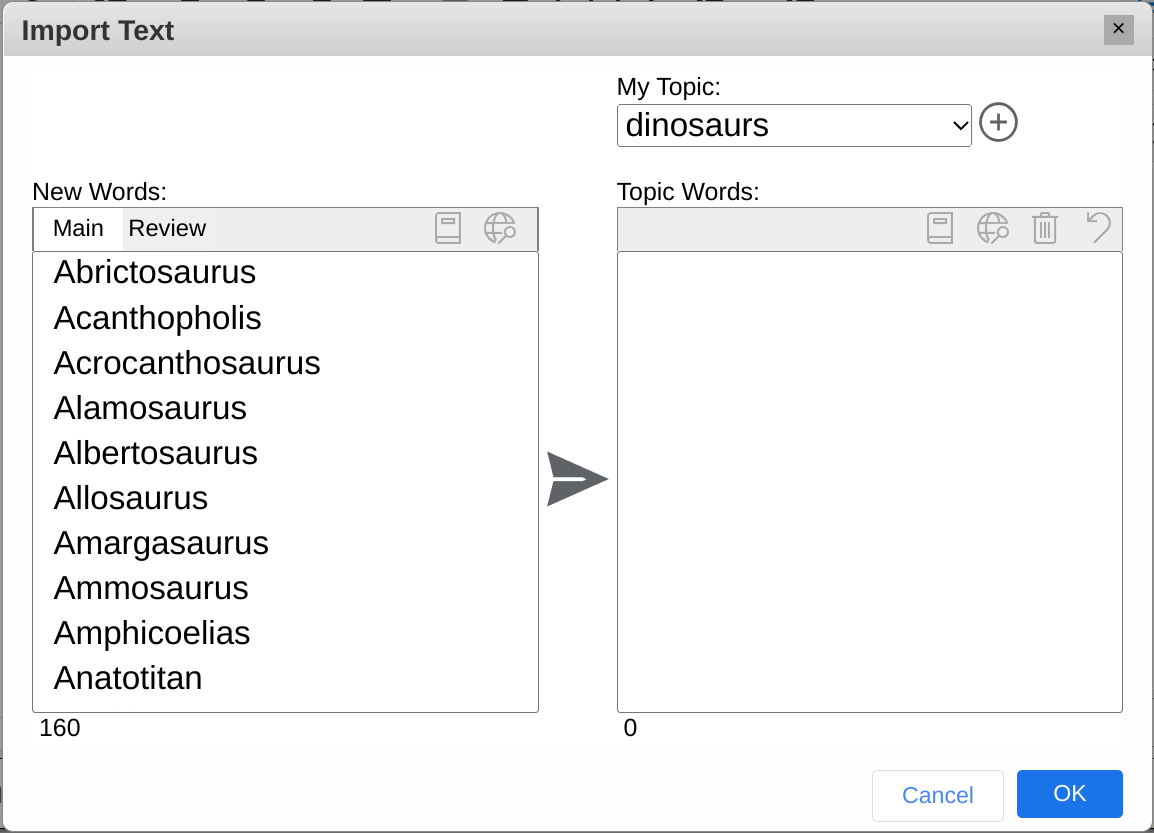
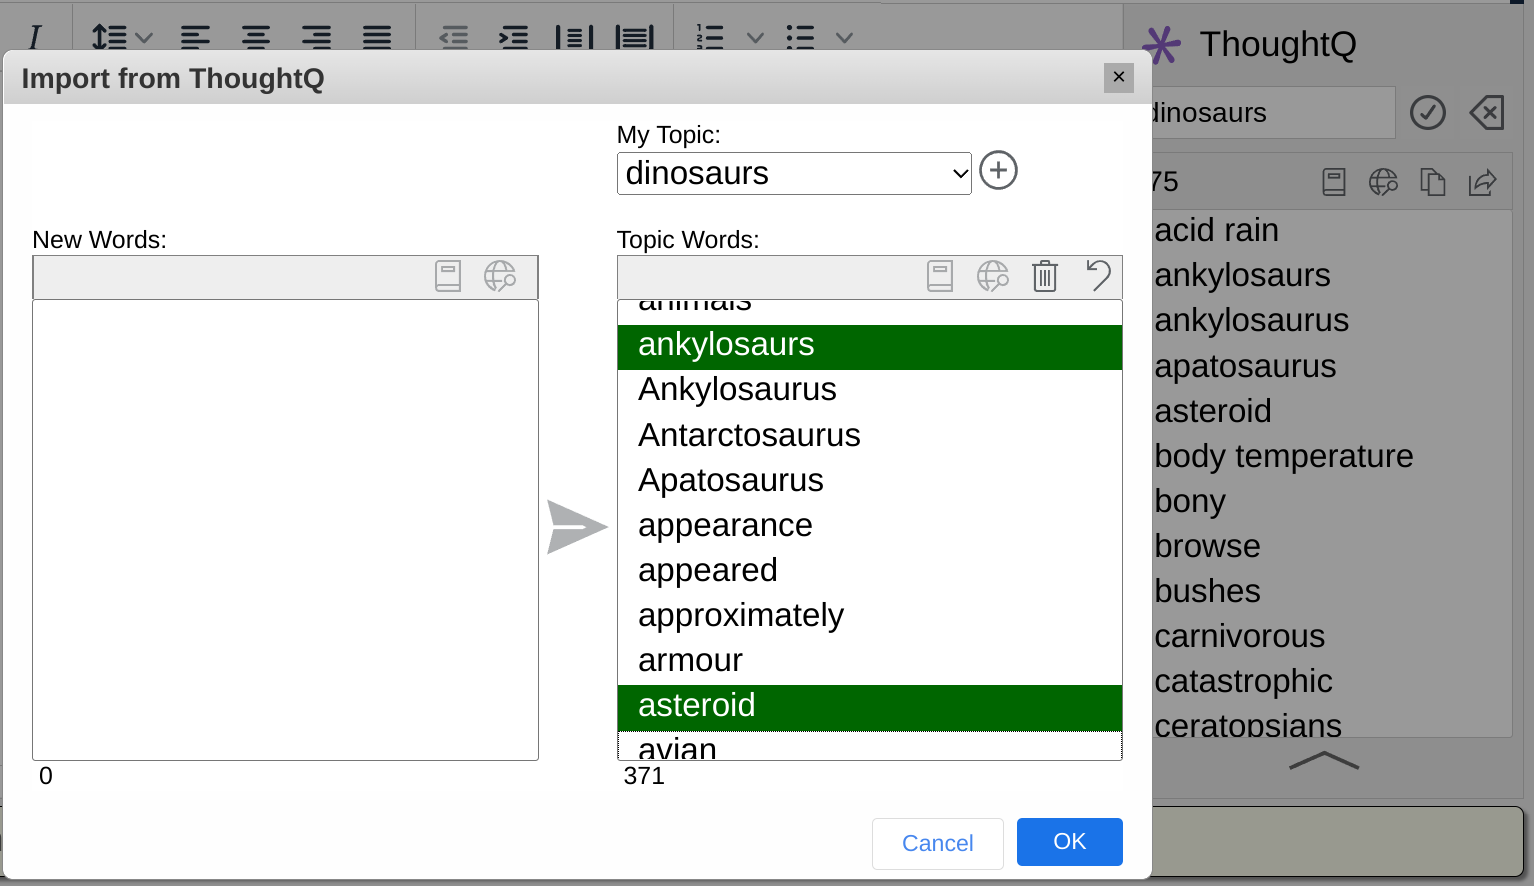
- In the next Import Text dialog, your imported words/phrases are shown in the left New Words list. Existing words (if any) within the chosen My Topic are shown in the right Topic Words list.
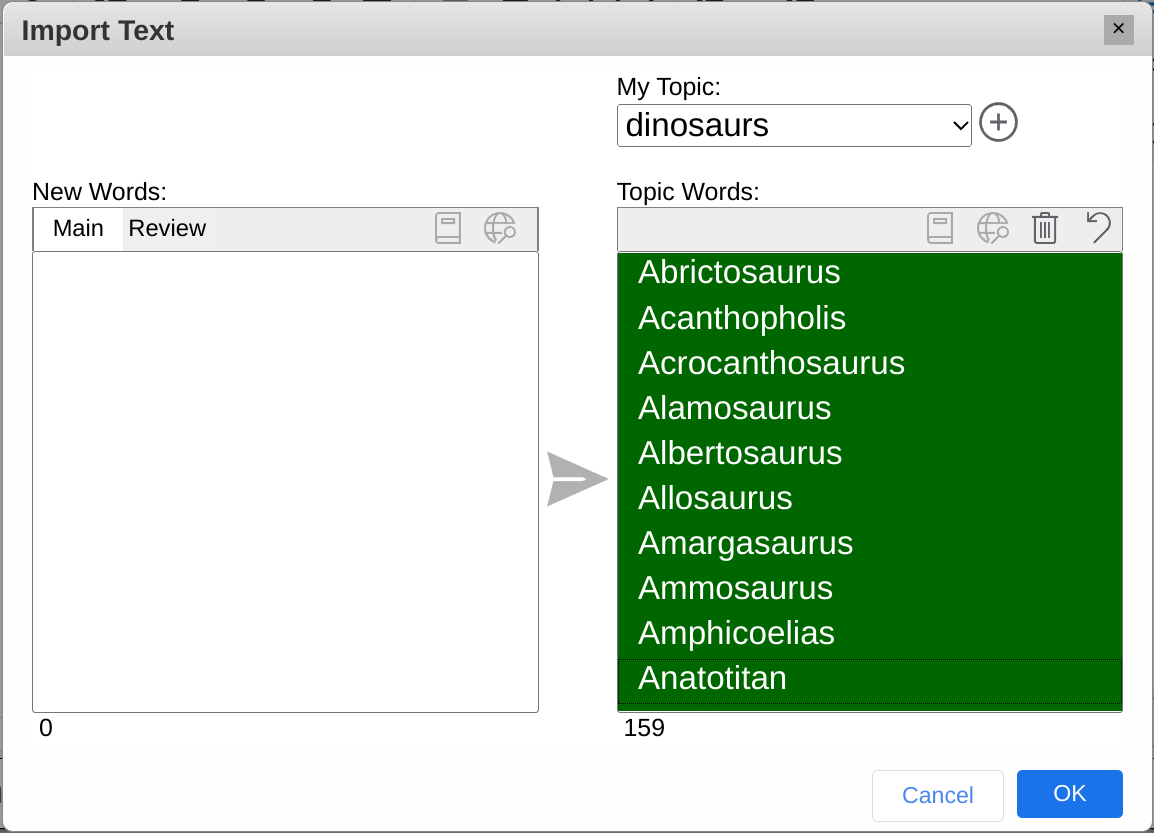
- You may copy all imported words/phrases to the topic list by clicking the Send
button. Or, you may manually select one or more imported words/phrases to send to the topic list.
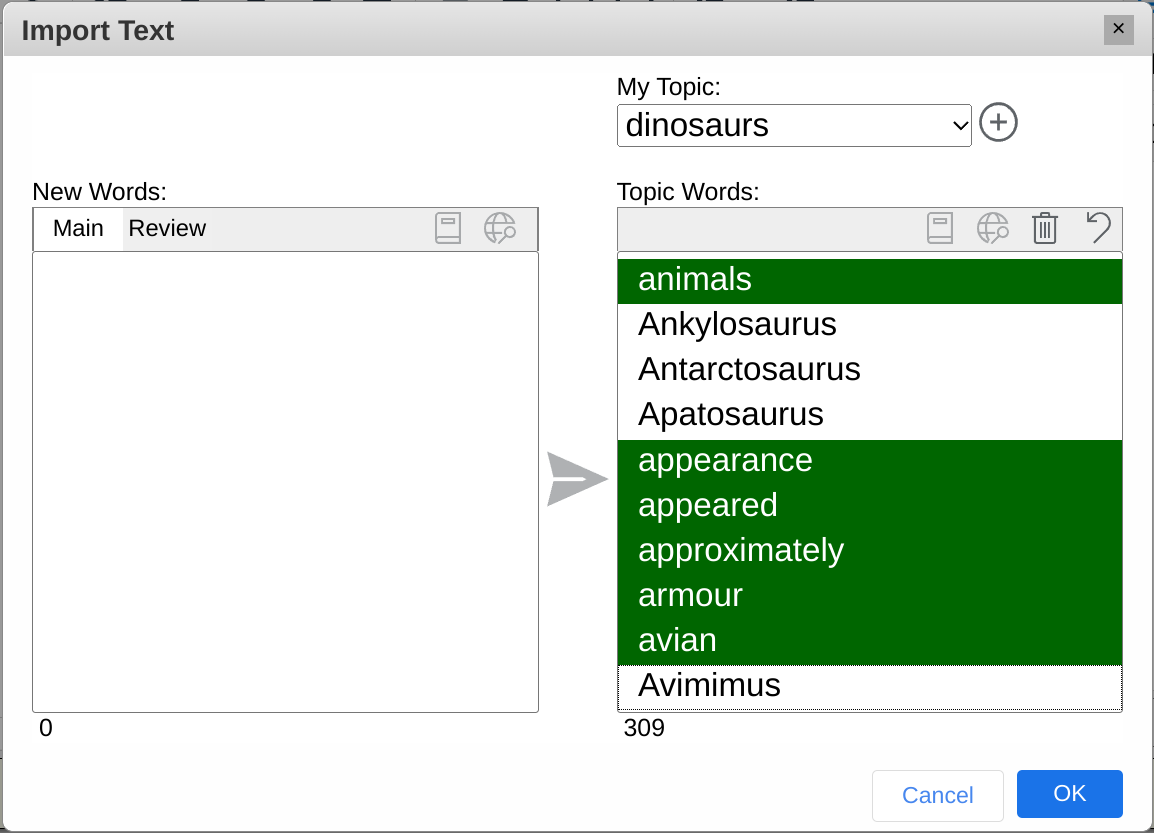
- Newly added topic words are highlighted in green.
- In either list you can look up a definition of a word by selecting a word and clicking the Define
button.
- In either list you can search and discover related information for a word/phrase by clicking the Web Search
button.
- Delete any unwanted topic words with the Delete
button.
- Undo an undesired copy with the Undo
button.
- Click OK when done.
WordQ can automatically learn topic words from any text that has been copied to the clipboard. This is most useful to quickly create topic words from a recent source of information or a topical area not revealed in ThoughtQ
First, open up an application, such as a web page, with content that you are interested in using. Then select and copy the text (usually all the text) to the clipboard.
Note: The application must allow you to copy text.
To add topic words from the clipboard:
- Click Edit Topics at the bottom of the list of topic words.
- In the Edit Topic dialog choose or create a Topic and then click the Import... button.
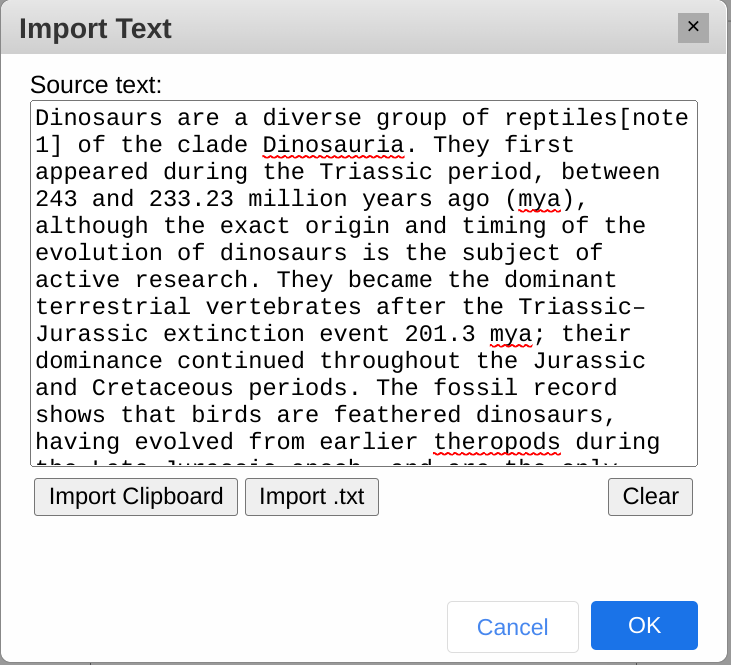
- In the Import Text dialog, click the Import Clipboard button and your Clipboard text will be shown for review. Click OK when done.
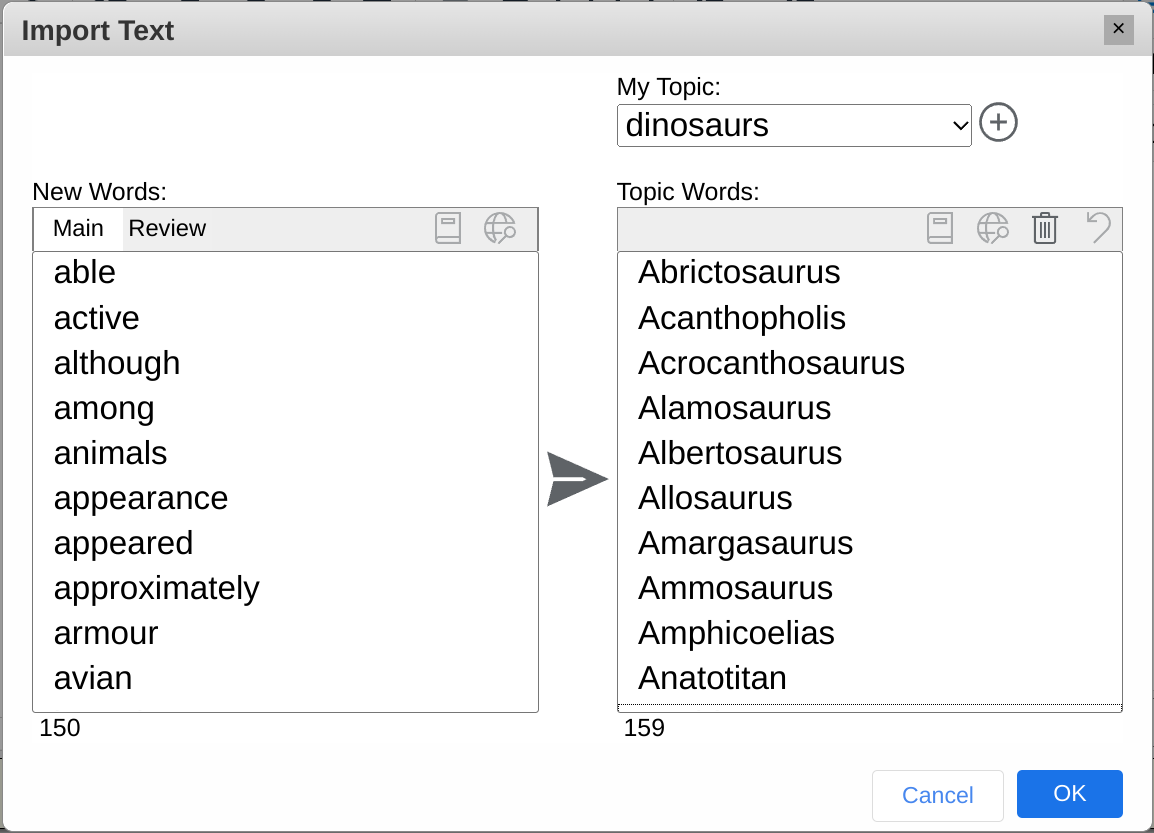
- In the next Import Text dialog, up to 150 imported words/phrases are shown in the left New Words list under the Main tab. Existing words (if any) within the chosen My Topic are shown in the right Topic Words list.
- You may copy all imported words/phrases to the topic list by clicking the Send
button.
- Newly added topic words are highlighted in green.
- You may manually select one or more imported words/phrases to send to the topic list.
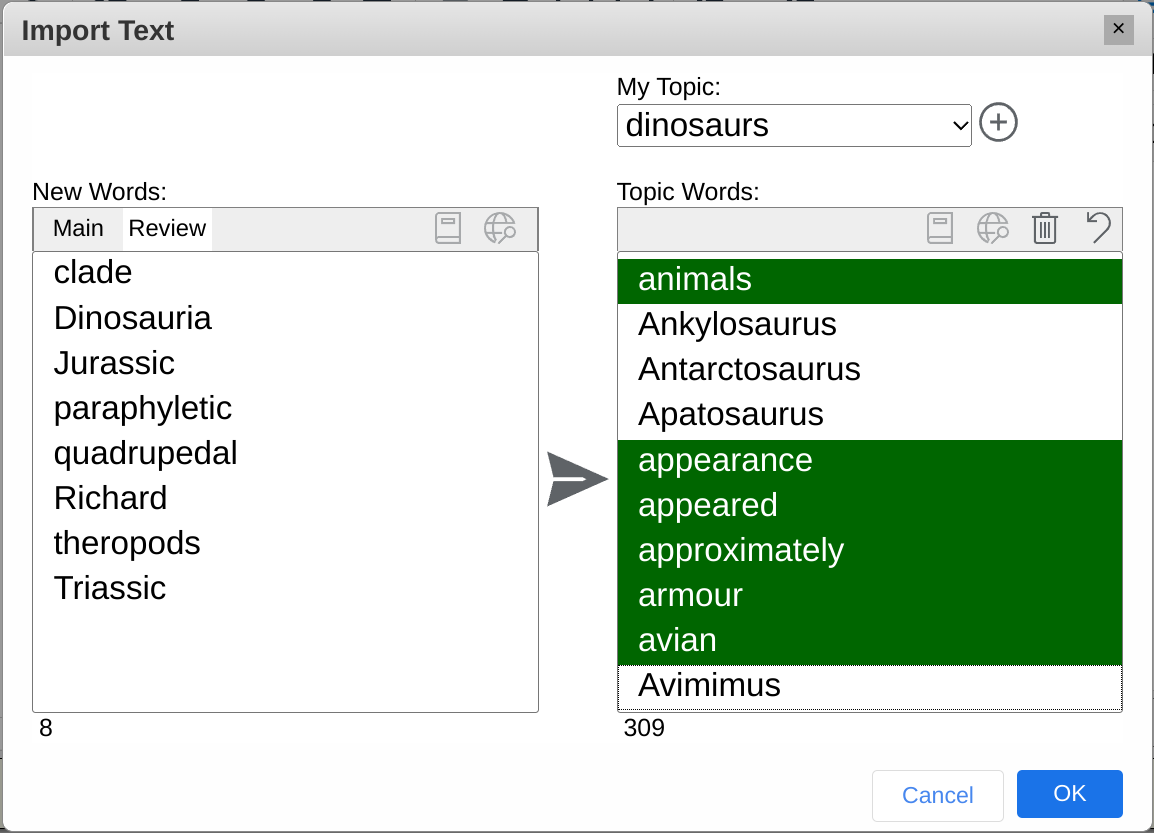
- Imported words that are not in WordQ's dictionary are shown in the left New Words list under the Review tab. These may be novel words or they may be misspelled in the original document. Review these words and selectively send desired words to the topic list.
- In either list you can look up a definition of a word by selecting a word and clicking the Define
button.
- In either list you can search and discover related information for a word/phrase by clicking the Web Search
button.
- Delete any unwanted topic words with the Delete
button.
- Undo an undesired copy with the Undo
button.
- Click OK when done.
To add a list of topic words (or short phrases) from ThoughtQ:
- In the ThoughtQ window, click the Import to My Topic
button.
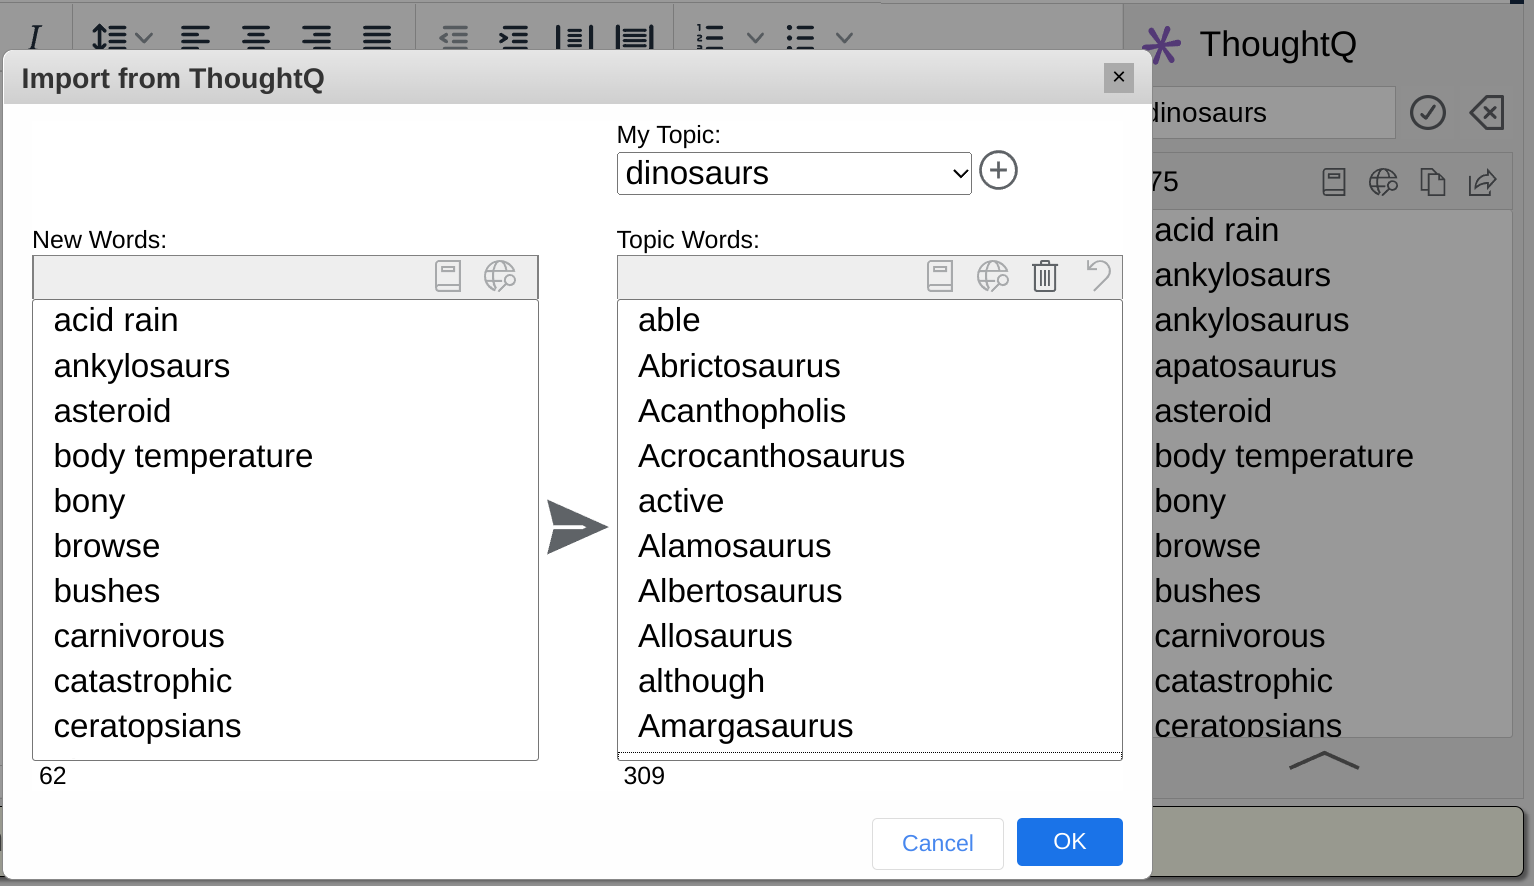
- In the Import from ThoughtQ dialog, your imported words/phrases are shown in the left New Words list. Existing words (if any) within the chosen My Topic are shown in the right Topic Words list.
- You may copy all imported words/phrases to the topic list by clicking the Send
button.
- Newly added topic words are highlighted in green.
- You may manually select one or more imported words/phrases to send to the topic list.
- In either list you can look up a definition of a word by selecting a word and clicking the Define
button.
- In either list you can search and discover related information for a word/phrase by clicking the Web Search
button.
- Delete any unwanted topic words with the Delete
button.
- Undo an undesired copy with the Undo
button.
- Click OK when done.
Proofreading
One of the most beneficial uses of WordQ is proofreading. You can listen to your work being read aloud while your text is simultaneously highlighted. The voice acts as an unbiased observer reading exactly what you have written. Mistakes, such as misspellings, missing words, or poor word order, stand out as sounding strange. Word prediction, supplemented with speech feedback, makes editing easy while you are learning a proofreading strategy.
If you hear a mistake, you can then step through the sentence word-by-word to locate the mistake. For example, you may hear two words that sound wrong together. You may have left a word out in between words or one of the words may be incorrect.
See Options: Speech Feedback for choosing the voice that you want. Voices that support word-by-word highlighting are indicated by *.
See Options: Speech Feedback for choosing the voice that you want. Voices that support word-by-word highlighting are indicated by *.
- Position the text cursor within a sentence.
- Click Read
 (CTRL (⌘) + 0).
 - Focus on sentence. The sentence is highlighted, and the predictions temporarily disappear.
- Listen to sentence. Press SPACEBAR, or by clicking
 to begin reading the sentence. Each word is highlighted as it is spoken. Listen for any mistakes.
 - Play or pause/resume. Press SPACEBAR, or by clicking
 or
or  to pause/resume reading.
 - Focus on sentence again. The sentence is highlighted again after it has been read.
- Listen to individual words for any mistakes. Move across words by pressing → or ← arrow keys, or by clicking
 and
and  .
. - Edit as necessary. Click within the text to make corrections.
- Repeat proofreading as necessary.
- Proofread other sentences. Go to the next or previous sentence by pressing ↓ or ↑ arrow keys, or by clicking
 and
and  .
. - Exit proofreading. Click within the text, press ESC key or click
 (CTRL (⌘) + 0).
Type your text as best as you can. Don’t worry about punctuation for the moment. When you have finished typing a section, use proofreading as described before to have WordQ read your text back to you.
If you’re not sure about punctuation, experiment. Put in a comma or a question mark where you think it might go.
Listen to the sentence(s) being read back. The speech will automatically pause at each punctuation mark and the intonation will change. Make changes until you are satisfied with how it sounds.
Français
 WordQ PDF Help